Blog Archives
Jessica: Cinnamon Kiss – swatches and review
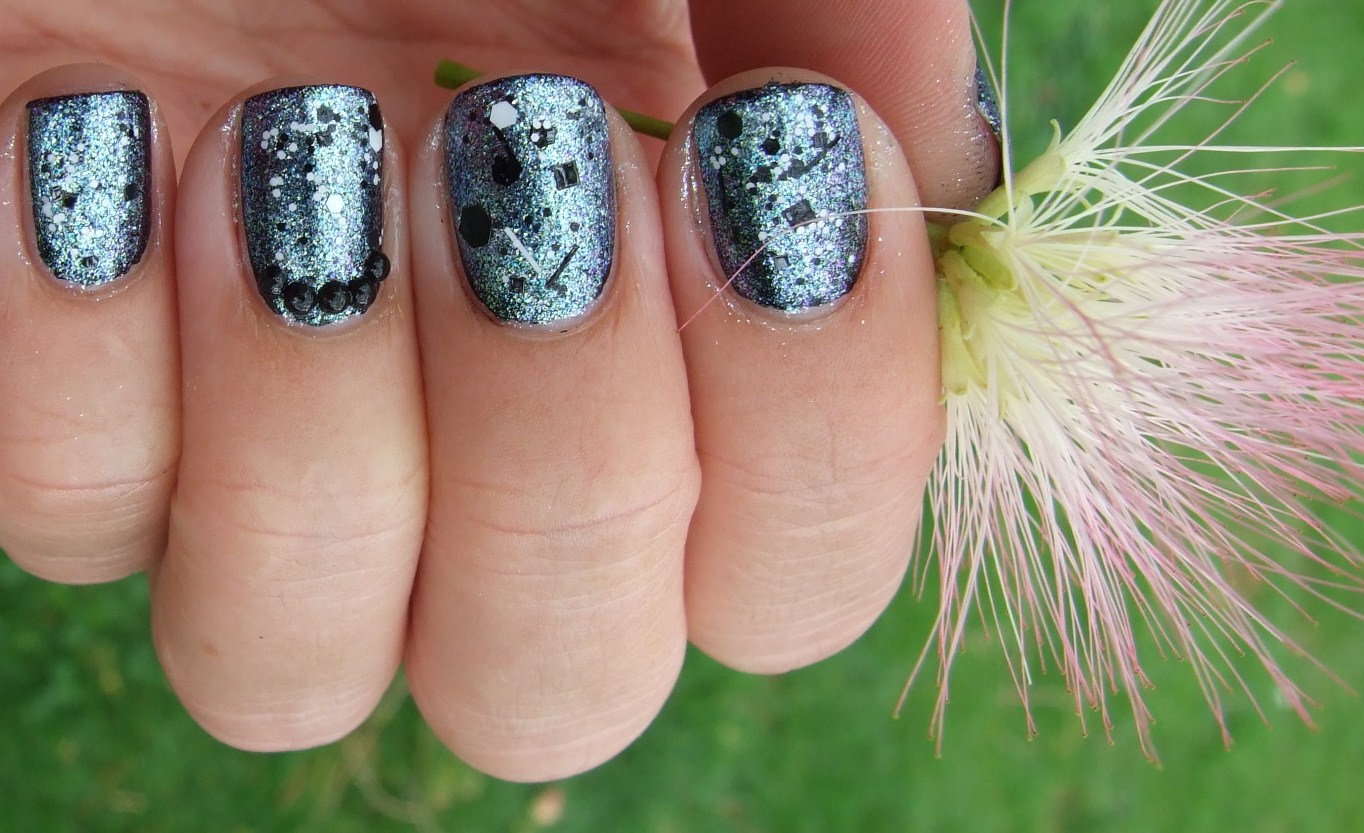
Introducing Jessica, Cinnamon Kiss!

Yeah, pretty. This was the first time I’ve used any Jessica polishes, I’ve been tempted by a few but shipping is pretty pricey, so this was the first I ever splashed out on.And if Cinnamon Kiss is indicative of the standard of all of their polishes, I want them ALL.

Photos show two coats, and Misa BREAKneck top coat.

The formula was perfect, the brush was the perfect size for my nails, and all up this polish went exactly where I wanted it to, and then stayed there. It did look a bit patchy on the first coat, but just amazing on the second. And I LOVE these kinds of colours!

My husband said it looks elegant, I think it looks a bit secksy. I love the sheen, and the shimmer, and the lit-from-within with darkened edges look.

My only gripe would be that I had some tipwear within an hour – and this was at night. I hadn’t DONE anything. So, that’s a touch disappointing, but no huge big deal.
Have a great day
Ami 🙂
All That Glitters:The Gold Rush – swatches and layering
A recent addition to my stash via a fellow NZ polish addict (thanks, Michaela!) who was having a polish destash; this is All That Glitters The Gold Rush.

One layer Kleancolor Black, two coats The Gold Rush, Misa BREAKneck top coat.

You see, I thought this was large gold hexes and silver glitter in a black jelly base. And it’s not. It’s gold hexes, silver glittes, and black glitters in a CLEAR base. So, I lost alllll the black glitters by layering it over black! Argh! Still, quite pretty, dry time was average – good, and it was quite smooth to the touch with the one layer of top coat.

and it matches this cute little chick verrrry nicely 😀
So, I tried again, this time over red!

Two coats Depend 36, a nice red creme, and one coat The Gold Rush, Misa BREAKneck top coat. I did like this better over red, and the way the base was slightly blackened gave depth to the red, and I discovered this has bar glitter in it! Surprise!

If only I could put polish on evenly in one coat.. alas, it is not a skill I yet have. One day.
Have a great day
Ami
Orly Pink Brilliance – layered with Daring Digits True Love.
Two coats Orly Pink Brilliance: a frosty metallic, very soft and flattering colour. Although I wouldn’t say this is VERY pink, there is a touch of pink in it!

Whole hand photo…

You do have to be quite careful with how you apply it, or the streaks will get revenge. If you load the brush up with polish and move along quite quickly, in a straight line, you should be alright.

And, like most solid polishes, any lines or imperfections can be disguised with a glitter top coat, if desired!

One thick, dabbed coat True Love: added the glitz that poor Pink Brilliance was missing on it’s own, though I think I prefer it without the red hearts! Easy enough to pop them back in the bottle though.

Topped off with one coat Misa BREAKneckk, but even with fast dry topcoat this took quite a while to dry, thanks to the thick glitter coat, but was nice and smooth when it was done.

Have a nice day
Ami 🙂
Two new frankens – including glitter!! Matte glitter!
I have previous blogged about some of the franken polishes my mother and I have been making – often from scratch. I’m having so much fun with it! And as one of my biggest expenditures (when it comes to nail polish) is glitter polishes, it’s logical that I want to make some of these types of polish for myself :). This is how I found myself spending a mildly shocking amount of money on solvent resistant glitter from Glitter Unique.
Go on, have a look. Double dare ya. I also bought some from You Mix – both stores shipped quickly, packaged well, and have awesome stuff.
These are two glitter frankens I made, instantly, with remnant polishes and some of the glitter from Glitter Unique (just because it got here first, ok?! No favourites here!) This is the first: The polish was L’Oreal Sand Dollar – and it was just too… beige for me. I added white hexes and hearts and a sprinkling of gold flakes.

I really liked the concept, which I was modelling after some other lovely indies out there (Hare Pegasus et al, thinking of you!).

I added a touch of Mode Sweetness and Revlon Sheer Pink to Sand Dollar to try and get the colour right, and a drop or two of OPI Steady As She Rose. I probably should have put a touch more Steady as she Rose into it, it was still a little too putty like for me.

Also, this has no suspension base in it, so the glitter sinks to the bottom. I did find that a good shake was enough to bring the glitters back up, but I did have to shake after every nail or so. So, not something I’d make again without suspension base, but fun to play with.

My other one was based on a mystery polish I have had for awhile, an old Barry M I believe (bought second hand with eroded labels). It’s a whole bunch of iridescent teeny glitters in a clear base.

I added dot glitters to this. Red and blue small shiny dots, large black matte dots, and stack loads of silver holographic butterflies.

Right hand! hah! I’m getting better at taking photos of my right hand 😀
I layered this over OPI Steady as she Rose (it was right there, after all!) and tried to hide my inner 12 year old girly girl squealing away. Then Mr Husband glances over, grabs the bottle, looks at it, and says ‘shall we call this one Hello Kitty Cosmos, then?” *&^&(()*&*(& hehehe. Funny.
I did layer this over a grey polish too, see if it looked as girly over that: This is Misa Grey Matters.

And yeah, not as girly, but still pretty girly. And I love it even more over grey.

I can see me wearing this over almost everything… and can’t wait to get into making more polishes with matte, satin, or interesting shaped glitters!

Have a sparkly day
Ami 🙂
Ozotic Beam 907: Swatches, Layering and Review.
Third of the four stunning polishes sent to me for review, this is Ozotic Beam 907, a pretty, sparkly, mother-of-pearl looking polish.

This shows three coats, no top coat. In these photos it looks a bit sheer, but the camera must have x-ray vision because I couldn’t see any sheerness in real life, it was too blingy for that!

Beam 907 has a very strong green flash to it, a lovely iridescence, but it isn’t greenish toned at all – it’s more a true definition of white ‘all the visible colours of the spectrum’ have been put in this – there is a rainbow, but it’s a iridescent rainbow, not a holographic one. Super pretty and clean, and it doesn’t look harsh at all!

And then, naturally, I thought about how it would compare to piCture pOlish White Wedding, which I bought some time ago.

Well, as you can see, White Wedding – on my ring finger) is much, er, whiter. It also starts off much softer, and the density builds up very differently. This is three coats of both (White Wedding and Beam 907), no top coat.
There is a ‘rainbow’ particle in White Wedding which is just gorgeous – it’s sort of a soft creme jelly hybrid with miniscule iridescent particles. Beam 907, in comparison, looks like it is completely made of those same iridescent particles, which are quite a lot larger.

Both are gorgeous, both are completely different. Both take awhile to dry without topcoat, too, beware of that. And of the two, I much prefer the brush in the Ozotic bottle to the White Wedding brush – the Ozotic brush is just a bit shorter and easier to use.

O.k, that’s a comparison! Now… how about layering Beam 907 over white? You know, to conserve the polish and everything – does that look different?

Uh, yeah. Very different. This is one coat of Kleancolor White, and one coat of Beam 907, no top coat. This is a harsher look, much ‘whiter’ and not as diffuse, but again that soft green flash and the multi-coloured iridescence softened it enough that it was still very wearable. One thing to note about Beam 907 – removal, while easy, tends to cover the fingers up to the knuckle with silver shimmer. Which takes FOREVER to get off. Just saying 🙂

And finally, I do know from stalking other blogs and swatches that the Beam and Sugar series are designed to be able to be layered, and I knew I wanted to do it over black. This is one coat of Beam 907 over Kleancolor Black – one coat of each.

And then I added one coat of Cover Band Sticks & Stones:

And I placed some black rhinestones at the base of my ring finger, and topped the whole lot off with Misa BREAKneck top coat.

This looked so much BETTER than I thought it would, the main colours that showed were green and blue, and some purple too.
It all dried about average speed with the fast dry top coat, and then wore quite well too!

You can buy Ozotic and piCture pOlish polishes from piCture pOlish website here, and Gracie Lou here in New Zealand. You can still scan the QR code on the side of the bottles to be taken to their websites, too.
Thanks for reading! Have a wonderful day
Ami 🙂
*Disclosure: the Ozotic polish shown here, Beam 907, was provided to me for review. All other polishes, bad cleanups, poor photography, overly wordy descriptions, opinions and random hand poses are entirely my own.*
New Years Eve Mani: A-England Holy Grail (revamped), and Ozotic Scatter 912
A-England would have to be one of the few polish creators out there who make nail enamels that I want every single one of. EVERY. SINGLE. ONE.
I actually can’t look at swatches of them too often, because I start to dribble, and that’s embarrassing. I don’t even play basketball. There’s no excuse. This is Holy Grail, the revamped version. I loved the original, but something about this one grabbed me around the throat and said YOU WILL BUY ME. So I did. My accent nail is black here, with Kleancolor Black, for the layering of the Ozotic.

But look at Holy Grail. Such a stunningly pretty blackened old gold shade, full of shimmer and richness. This is two coats, it’s almost a one coater. If you want to see more swatches, check out Ommorphia Polish Bar (link) – she is just amazing at conveying all the gorgeous of these polishes. Be warned, though, wear a scarf. Protect your throat. 😉

Then on my accent nail I added one thin coat of Ozotic Scatter 912 – I chose this one because as well as the purple and holographic, it has a lovely gold colour change in there too, which works with Holy Grail.

This is another stunner. I’m running out of superlatives here. Besides you can go see it here 😀

And then, NEW YEARS EVE! Party! I added a thin coat of my blingy franken – gold and silver and holographic polishes all mixed together – over Holy Grail, and to the tips of my accent nails.

And then I took a million photos of it, because I loved it so much.

The blackened gold of Holy Grail kept the yellower gold glitters in line, and the silver and holographic glitters set everything off into party mode.

I topped this off with Misa BREAKneck (I need more of this, its blimmin awesome) and it was all nice and smooth.

This candle was handmade by my mother, and given to me (along with a blue dragon candle) for Christmas. Am I spoilt or what? 😀 She’s so clever. I love her candles so much that I never, ever, burn them!

HAPPY NEW YEAR, everybody – may 2013 be filled with moments of blissful contentment, fun, joy and enough work and learning opportunities to make us all appreciate the former, and still grow as people.
A week of holiday nubs – nail diary :)
My nubby diary for the week… sorry about the mess/bad lighting in a few of the earlier photos, I found it much harder to clean up than normal (less nails, same amount of polish on brush = massive flooding). But, here they are!
A franken of mine – green jelly with multicoloured green glitters. I had it at two coats, then jelly sandwiched it with Darling Diva Polish Vetiver in the middle. Gorgeous green glitter.

sorry for the blurry, and bad lighting! But this is more a diary than a swatch..
Darling Diva Polish A Christmas Story, three coats plus top coat.

oooh messy.
Very, very sparkly and gorgeous in the sunlight! Don’t worry, I’ll re-swatch these properly when my nails grow back in.

Darling Diva Polish Holiday Lights is the glitter topper here, red, green and gold CIRCLE glitters. Squee! The silver holo is Color Club Harp On It (two coats), and the accent nail is Darling Diva Polish A Christmas Story – three coats. All covered with Misa BREAKneck top coat.

And here is Darling Diva Polish A Christmas Story, layered this time over China Glaze Thunderbird. I definitely preferred this layered, it made it redder. The combo of glitters in A Christmas Story ended up having a brownish tint without the layering – but this was easy, and gorgeous. 2 coats Thunderbird, 2 easy coats A Christmas Story. My accent nail is 2 coats China Glaze Jolly Holly with one coat of D.D.P Holiday Lights. All are topped with Nail Pattern Boldness Glitter Food and L’Oreal Quick Dry nail polish.

Full hand shot.. look at all my half-grown baby chicks! Well, ok, a very small portion of my baby chicks 😀

Then, this is the exact same mani but I wanted MOAR – so I added a layer of Darling Diva Polish Snowball to my middle finger. Those snowflake glitters are gorgeous – and a little too big for my curvy nails. I had to fish them out with a needle, but there’s an abundance of iridescent and white glitters, this is a super awesome topper. Finished with N.P.B Glitter Food and Misa BREAKneck
 .
.
Another photo of the three different polishes!

And finally, one coat of D.D.P Snowball over two coats of Revlon Royal. I might try and wear this all winter (o.k, probably not, I love changing my polishes too much. Still, the thought it there!). Love…

Another angle, more sunlight, and check out that little munted snowflake. See? They ARE unique! 😀

And Micro Macro…It was interesting that Snowball kind of lifted some of the blue from Royal onto the snowflake. It was dry… maybe a top coat in between next time, huh. Royal is crazy pigmented.

If you’d like, come ‘like’ me on Facebook! (button is just over on the right, at the top – click it, you know you want to!) I put all my posts there, plus extras. O.k, usually funnies, but who doesn’t need a laugh every now and then, right? Be nice to see you, not just a stat! 😀
Have a great day
Ami
Darling Diva Polish: Chrome Job Swatches
This is another super polish from Carrie of Darling Diva Polish: Chrome Job. This is from her Battlestar Galactica collection; the name is slang for the Cylons – robot people whom the human people are battling with.

Chrome Job is a glitterbomb in a clear base, and I immediately thought of Megan from Two Lacquered Girls when I saw it 😀 It’s multi-shaped silver (hexes, bars and tiny glitter, mostly), large gunmetal grey squares, small black hexes and matte red squares. Because it’s in a clear base it’s made for layering, and I used Zoya Dannii because a) I thought it’d suit and b) I already had it on. Bonus! 😀

Love the red glitters against the purple base! Looks opulent, somehow.
Love it. This is two coats of Chrome Job over two coats of Dannii. You don’t need to fish for these glitters, you need to scrape your brush and put some back in the bottle, this polish is PACKED. There’s a bit of dabbing needed to cover all of the nail, but nothing strenous. I finished with a thick layer of Kleancolor Fast Dry to cover the glitters.

One thing I noted was the large gunmetal grey squares have a slight curve to them: I’ve read of curling glitter and I wouldn’t say these CURL, but they are curved. It was easy enough to flick them over so they go with the curve of my nail though – but if I missed one the edges did stick up. And then I pick at them.. don’t do that 😉 Also the bar glitters ate some top coat and stuck up in little frizzy fringes, so I’d recommend two coats of top coat for this one.
Just for fun I layered it over Misa Grey Matters – I want to see ALL the colours, so light tones work best I think. I’d also try it over light green and blue, and perhaps pink or yellow… it would be interesting! This looks great, too. Two coats Grey Matters, one coat Chrome Job, no top coat…

And two coats Chrome Job plus Kleancolor Fast Dry top coat, over the Grey Matters.

Inside lighting…
Macro..

Loved it. It does take a while to dry, so put this on when you know you can read or interweb surf for awhile, then enjoy the insane glittery goodness from this! This photo was taken after 24 hours, one of the larger glitters started to peel and stick out: I think it’s a good idea to put a lot of top coat on to stop this from happening.

But look. Just look. It’s AWESOME. It’s blingy, and out there, and perfectly reminiscent of robots. I love it 🙂

Outside, full sun 🙂
Have a good day
Ami 🙂
Darling Diva Polish BzzBzz: skittles
One of the things I like to do when choosing a top coat glitter polish is to sit and think about what that particular top coat would look good OVER. This is quite important to me, not only does it make choosing more fun, but it also means I get a lot more wear out of the polishes I buy. And with 4 people, 1 cat, 1 dog, and 37 chickens on 1.3 incomes, I can’t afford to buy everything I want, so I do put a lot of thought into my purchases. Mostly hehe.

See? Lots of colours work with this top coat!
BzzBzz by Darling Diva Polish hit a lot of my ‘buy now!” triggers – the base was clear, the colours were yellow gold and black, so theorectically I could wear it over a lot of colours. Yes! It’s true! I could! Here is my skittle mani, 10 colours I thought should go well with BzzBzz:

Left hand polishes (left to right)
- China Glaze Let’s Groove – 2 coats
- China Glaze Harvest Moon – 2 coats
- Color Club Pardon My French – 3 coats
- China Glaze Drive in – 2 coats
- Misa Grey Matters – 2 coats (on thumb)

Right hand polishes – left to right

- OPI The One That Got Away – 2 coats (on thumb)
- Kleancolor Metallic Aqua – 2 coats
- Depend No 210 – 3 coats
- Orly Nite Owl – 2 coats
- China Glaze Re-Fresh Mint – 2 coats

BzzBzz was 2 dotted/placed coats, and it was finished off with a coat of Orly Sec ‘n’ Dry
I wish I could have got a flower on all of the nails, it sort of seems unfair that I couldn’t. Also, sorry about the blurry photos and raggedy cuticles on my thumb and right hand, I guess I don’t take as much care of that hand as it’s not photographed very often at all! I loved the yellow flower and gold hex’s over the deep purple (smooookee on the waaaatterr… ahem) – China Glaze Let’s Groove, little finger left hand. Shame I lost the black…
I also wore a mani of A-England Dragon, and I just can’t take that polish off the next day. It’s a stunner. However, I put on last Wednesday (the first school visit for my eldest son) and I chipped one nail pretty quickly in my nervous neurosis, so thought it would be a nice idea to layer another polish over it – yes, BzzBzz!
")
A-England Dragon with DDP BzzBzz on accent nail
I loved this, remind me of flowers on the grass. The holographicness of Dragon peeped through and the gold and the flowers were stunning against it.
")
Which of these would be your favourites?
Orly Ingenue Swatches and Nail Fun
This was an impromptu purchase from Beyond Beauty (great website, by the way, for any NZ readers! They sell mostly OPI but also some Orly and Essie, and for very reasonable prices and shipping is $4 for up to 4 nail polishes, and you get it delivered within 2 working days). So, I bought my mother an Designer Series OPI, and couldn’t buypass this one, which was on sale for $10. I like Orly nail polish, sometimes they dry slow but they are lovely colours, don’t test on animals, I adore their rubber handles and they are bigger than normal polish. And it was on sale.. 😀

Orly Ingenue
So, a series of crappy and tiny photos, because I didn’t realise the camera was set on TEENY setting… sorry about that.

Orly Ingenue, shade – shows some of the peachy tones the gold shimmer pulls in dimmer light 🙂
Such a pretty colour. It’s quite sheer at first coat, mostly an explosion of tiny gold glass flecks that look like teensy weeny glass balls. SO pretty, and I really want to try it over a dark colour. It does build beautifully, and the dusky pink/purple comes through – these photos have three coats, no top coat.

Orly Ingenue – the main colours of pink/purple with gold shimmer 🙂
And, being me, I wanted to change it up a bit, so I put on Misa Toxic Seduction on my thumb and middle finger, then dotted Ingenue over that in a asymetrical pattern, and a top coat of Orly Sec ‘n’ Dry. And noticed my camera setting, swore under my breath, and changed it back to it’s normal setting.

Orly Ingenue, Misa Toxic Seduction with Ingenue dots.
I liked this too, the contrast was pretty. Whole hand shot…

The Misa was two coats, and I did put a top coat over all my nails after I added the accent nails. Toxic Seduction dried really fast, but Ingenue was threatening to not dry at all until I put the top coat on, and then it dried super fast and super smooth, and extra, extra blingy. Wear time was moderate, a day before it chipped a bit on me, which is average /good for me and how rough on my hands I am 🙂
Have a great day!

