Blog Archives
Too many untrieds 1: China Glaze, Color Club, Models Own, Orly, De Sol
I have a few weeks now to try as many of my untried nail polishes as possible, to declutter that corner, and make me feel better about myself, in general 😀 So, lots of swatches to do, photos to take, and long photo heavy posts with not much writing coming up! Please feel free to ignore these completely 🙂
CHINA GLAZE
Electrify – 2 coats & top coat

Stolen from my mothers destash – hyper pretty and sparkly!

OMG A UFO – 2 coats no top coat

LOVE! gorgeous colour (more olive than gold), easy application, streaks disappear when polish dries, nice smooth holographic shimmer.

Holly-Day – 2 coats no top coat

Just a stunning polish. Simple, beautiful, slightly lighter than the photos are making it look. Glossy. Perfect.

MODELS OWN
Beth’s Blue – 2 coats, no top coat

almost a one coater, because of the Rampaging Polish Blob effect, but the plus is it still works out and blobs in the right place, not runny. Gorgeous light periwinkle blue!

Aqua Violet -3 coats, no top coat

very pretty aqua through teal to purple multichrome, love it! (this one is from Sister V’s destash).

Very, very nice
Pinky Brown – 3 coats, no top coat

nice formula, needs three coats because it does go a little patchy, and to be noted, this one has a stronger smell, petrol like. Not over powering to me, but I know some people are really sensitive so I’ll note it! But check out the colour shifts.. pink, brown, gold, green, and I love that the multichrome is a glass fleck, not a chrome 🙂

COLOR CLUB
Eternal Beauty – Halo Hues

Oh, Color Club Halo Hues. How I love thee. Please keep making these. Make ALL THE COLORS. thanks.

2 coats, no top coat. such a nice formula, easy to apply, and fast drying, and that holographic effect is just stunning.
Wham! Pow! 3 coats, no top coat

colour adjusted to show colour of polish, ignore bright red hands! 😀
would need a top coat, it dries matte. Quite jelly-ish, and freaked my camera out! It looks light orange through the lens, but in real life it’s an intense highlighter neon orange, almost shading to red in the direct sunlight. I like it, even though it makes my eyes want to fall out 😀

Feelin’ Groovy – 3 coats, no top coat

Another jelly neon, this one is highlight green :)Moderately sheer, though it dries fast enough not to resent needing another coat or two. Also dries matte, so top coat will be needed. My camera won’t show how bright this is in real life 🙂

Trippie Hippie – 2 coats no top coat

needs a third, but in a hurry 🙂 formula is a little runny, but the polish is shimmery and pretty 😀

Australis – Polish Pots, no name on bottle. 2 coats, no top coat

just a gorgeous shiny deep colour, I adore this!

ORLY
Grape Glitz Mini – 1 coat over the purple Australis polish above

nice and shimmery, not too exciting to me.

Orly mini, no name but I think it’s Rage. 2 coats, no top coat.

Fast drying, and just gorgeous. I may need a full size of this, or make something like it.

Orly It’s Not Rocket Science – 3 coats no top coat

pretty, sparkly, that swampy green base which I like, but I can’t see any blue duochrome on the nail! I might try 2 coats over black sometime, and see if that brings it out.

The only way I could see even a hint of the blue..

Orly Androgynie – 3 coats, no top coat

Lovely! This could be layered over black for a darker base, but I like the fact it looks dark inside, but a deep brown with gold flakes in the sunlight. The larger iridescent rainbow hexes sink, but I turned the bottle upside down (in a jar, it won’t balance on it’s rounded lid) for 10 mins before applying, and they came out fine.

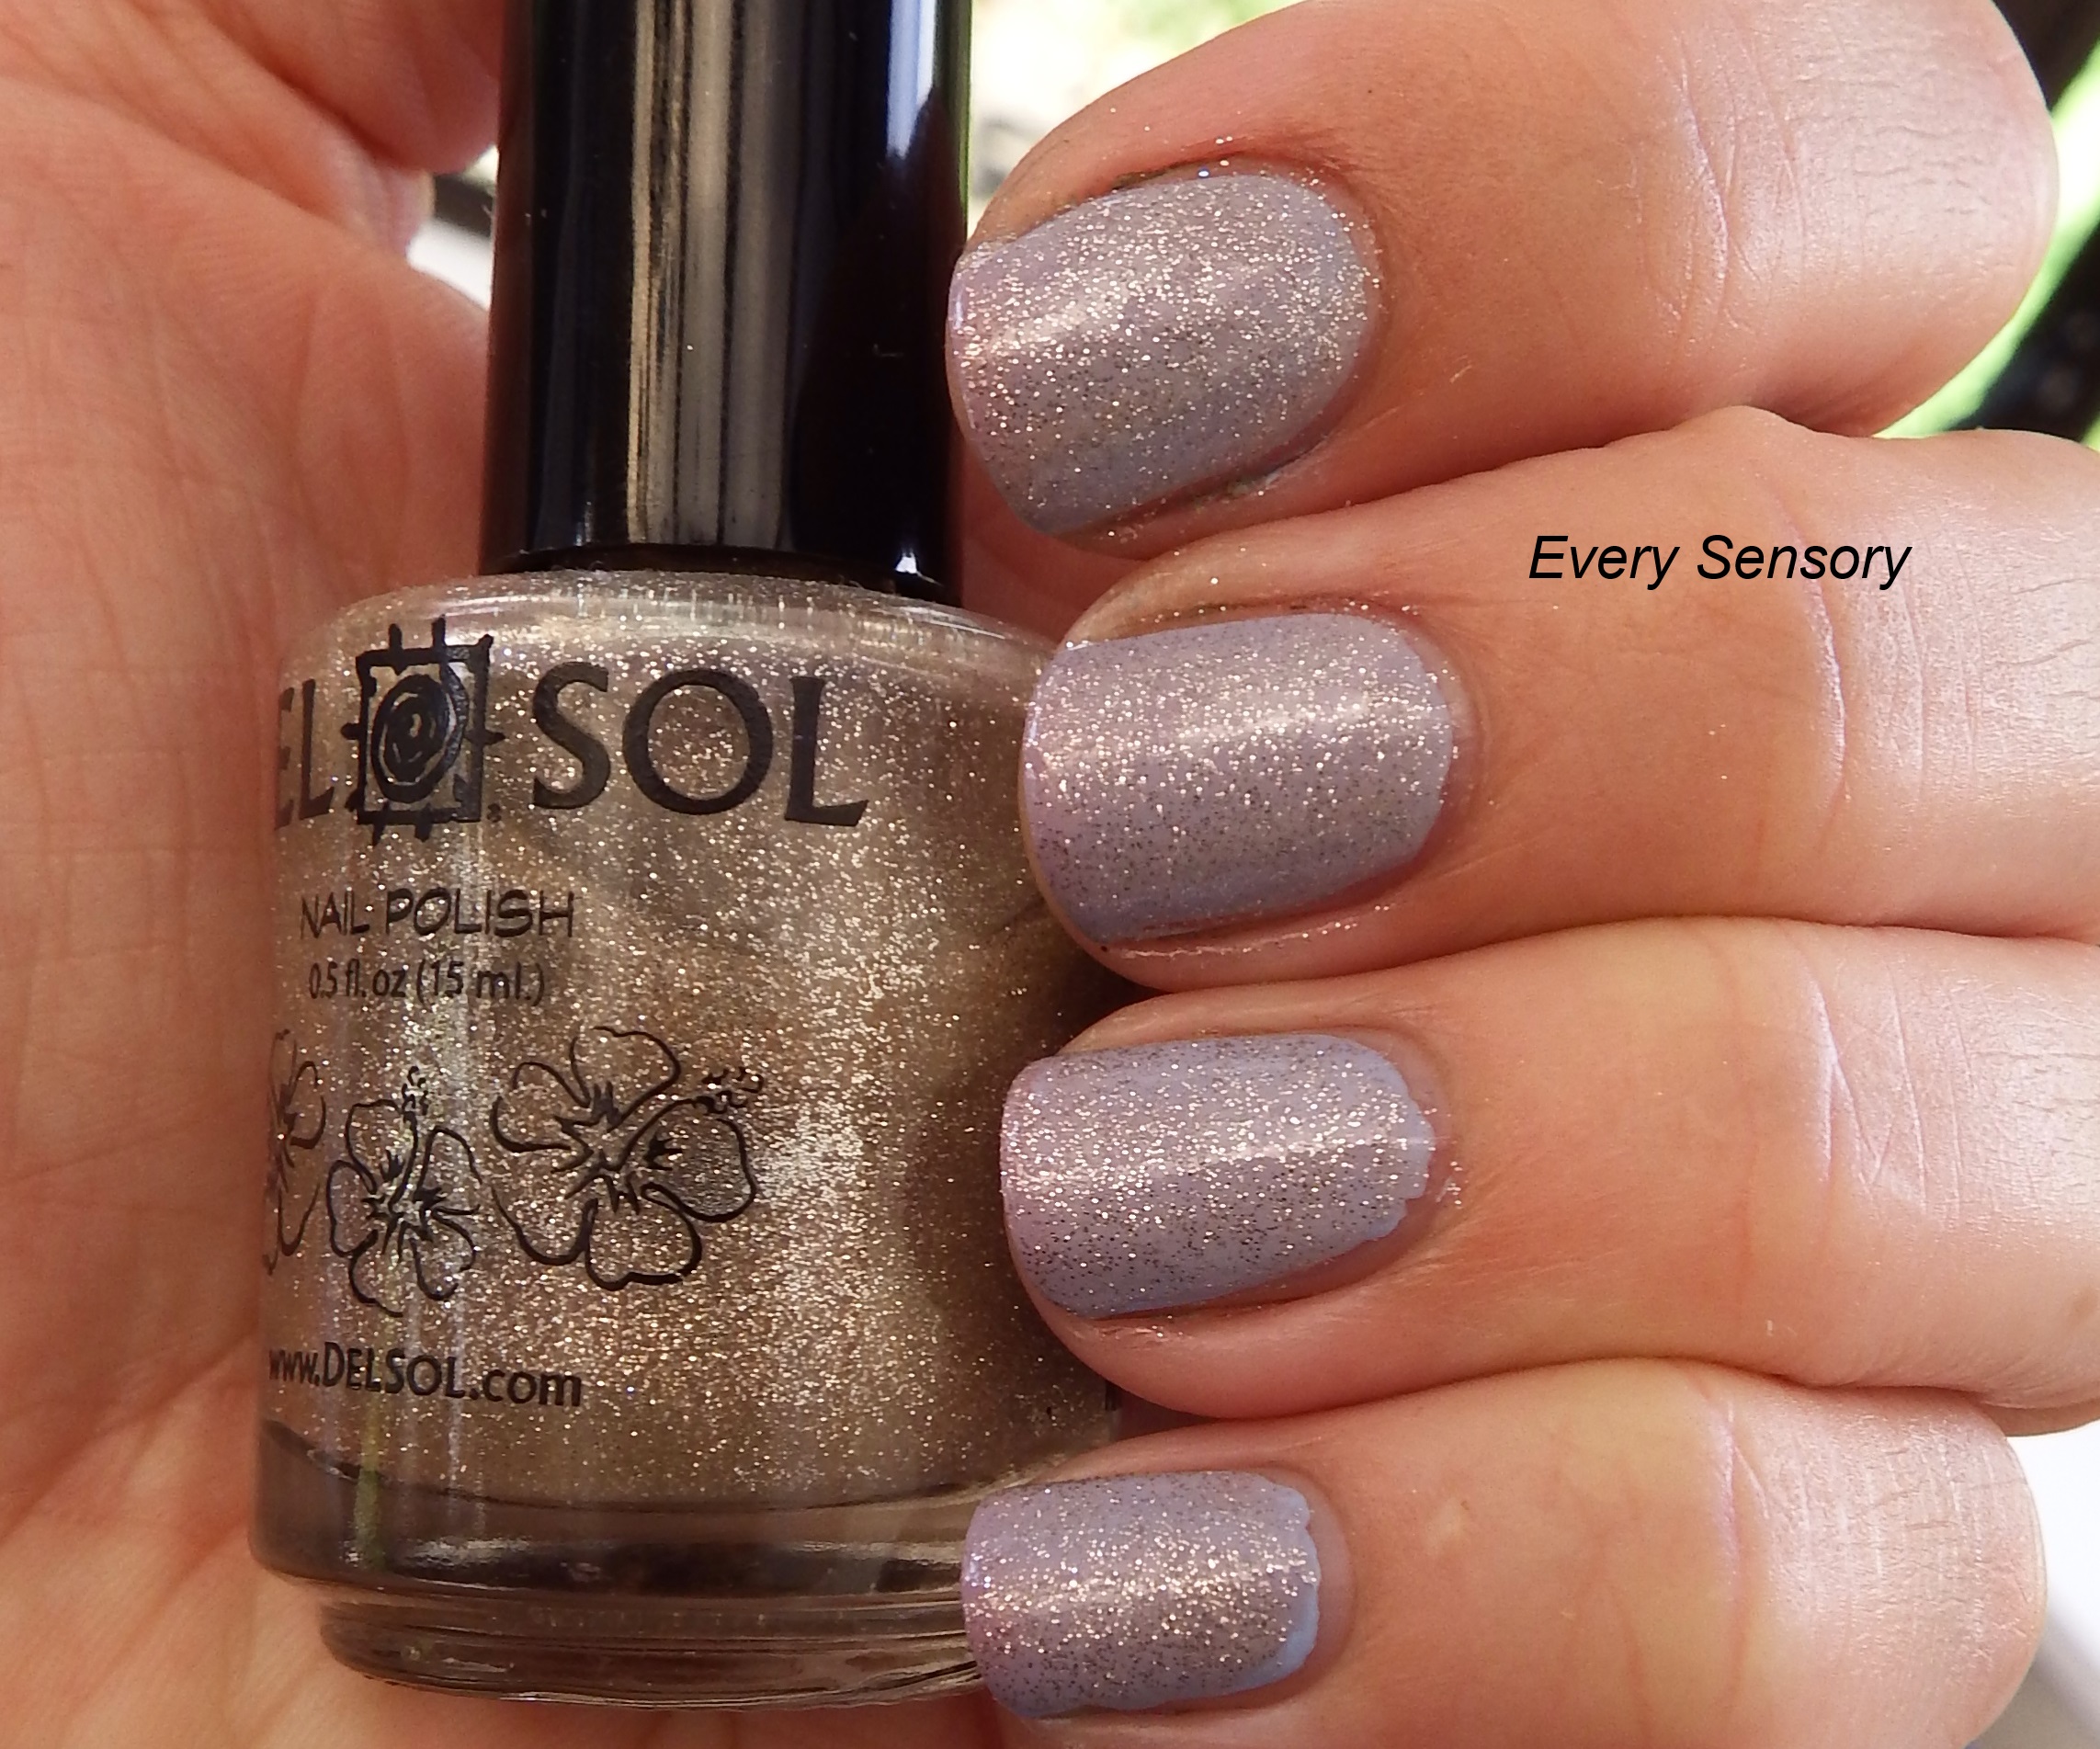
DE SOL
De Sol Starry Night – one coat over Models Own Beth’s Blue.

Gold in a gold tinted base inside, dark purple in the sun.

De Sol Ruby Slipper – one coat over Beth’s Blue.

Silver in a clear base inside, pink in the sunshine.

One thing I’d recommend with these is to apply them in the sunshine, and try two coats 😀 See, I added another coat of Ruby Slippers – in the sun – and it evened right up.

Plus it still looks pretty in the shade 😀
If you’ve made it this far, hats off to you! Well done! More to come 😀
Australis Brush-On Perfection Eyeshadow in Warhol
Bought from Reduced to Clear (I know, cringy name, but they sometimes have cheap cosmetics and they always have cheap chocolate!) for $2.

There were 3 colours in the shop, I chose this one as it looked like it could be a neutral OR a goldish toned shimmer from the colour circle on the base:

Why yes, yes I WAS feeling optimistic that day 🙂
The colour circle is on a button, that you click to deliver the eyeshadow to the brush…

Blurry brush shot – it’s a nice enough brush, I guess, soft but nylon-y.
and click and click and clickedy clickedy click click click.. .check… click clickclickclickclickclickclickclickclickclickclickclickclick.. etc. For purposes of review, I carefully counted my clicks so I could tell you how many it took. Well, it took 35 before I went mental and just clicked frantically.
[NB: Frantic clicking hurts the button. If it gets stuck down you can take it off, put it back on, and it still works fine.]
This was a cream, not a powder. THAT was a suprise. And because its a cream, not a powder, when it eventually came out onto the brush, it kept coming out, and out, and out, and getting curlier: quite like a stood-upon toothpaste tube.

Camera wouldn’t focus, I guess it didn’t want to look either.
But, here it is, swatched over bare skin.

Its orangey nude. And very greasy. It creased INSTANTLY, even over eyeshadow primer, and just didn’t look good at all. Maybe it was because there was so much on my brush (yes, I took most of it off, but.. it was pretty saturated). I don’t know if I’d bother trying this again. Brush on eyeshadow, yes. Perfection? Well, not for me!
The good news, it was cheap. The bad news, it was.. well, cheap. I’ll stick to my Dollface, Ro Vie, and Chromatic Cosmetic shadows, I think.
Australis Speck-tacular over China Glaze Liquid Leather
You know something? I hate the name of that flakie polish. Speck-tacular. Thats a gag-worthy ‘pun’. I read a research article where a group of scientists tested how many puns out of ten would make people actually laugh, and it turns out that no pun in ten did.
Sorry.
Anyway! I don’t like the name, but I do like the flakies. I love that it has all the different colours! I bought this from Farmers store for $14 NZ. I wanted to show off the colours, and what better way to do that then over black, right? (well, I’m planning on putting it over a deep blue at some stage, to try and create a blue opal effect, but that has yet to eventuate). My best black polish is China Glaze Liquid Leather – these photos are two coats of Liquid Leather, and then one coat of Speck-tacular, then one coat of Orly Sec ‘n’ Dry.

See how the black makes the flakies show up in all their multi-coloured glory? The flakes don’t change colour, but as you move your hands a different flakie will catch the light, and it will have a different colour to it’s neighbour, so the effect is of changing colours flashing over your fingers. Very pretty and opalescent.

Now, I did say Liquid Leather is my best black polish, and it is. However, it’s not a good black polish, and I’m on the lookout for a better one. I love how shiny and black it is, but… I put this polish on at 7pm. These photos were taken at 8am the next morning. You can see all the tipwear and chipping – and thats OVERNIGHT. See, I’m not ok with that. Shame, because I love everything else about it.

So, there we go, my black opal mani, I really liked this apart from the chipping of Liquid Leather – and had a few nice comments on this one. 🙂
Have a great day!
Purple Glitterbomb time with OPI DS Temptation – pic heavy
My mother bought OPI Designer Series Temptation, and let me try it on. Temptation is a mixed purple and blue glitter in a blue base. This is three dabbed coats, and you do have to dab it, it will not spread on like normal polish, even though the glitter is quite fine. After the careful dabbing it was still sheer in places at tips, you can see the blue base in patches in these photos. I added one coat of Orly In A Snap topcoat, this was still a bit gritty after that. Dry time was moderately good.
Sunlight….

Shade…

One coat Kleancolor Starry Purple ($3 from Coin Save, utter love!)

Bottle shot of Starry Purple..

One coat Rokk96 Sequin

One coat Kleancolor Chunky Holo Purple; this is so hard to photograph. In real life the colour shift is really strong, but I could only show a glimmer of green in this blurry photo.

One coat Australis Speck-tacular

One coat Orly Sec’n’Dry

Super smooth and blingy now! Photos are pulling much more blue – this is PURPLE. red/violet purple. A heap of depth (actual physical depth, these are thick polishes all layered up like this) and interest – sort of Orly Fowl Play-ish, but much lighter purple.

This photo was the closest to the real colour I could get.. so pretty. I did like how blingy it was, that was appealing! It took me a year to take off though, but I was expecting that with all the glitters 🙂 I did like the DS Temptation much better with the glitter overlays, even just the Kleancolor Starry Purple.
Kleancolor Frappachino goes WILD
I did a whole bunch of photos of this pretty, subtle but shimmery copper brown Kleancolor. And my darling eldest son deleted them. So, I put it back in the ‘to photo’ pile – until today. And here is Frappachino – a colour I will forever associate with my blogger friend Del from Domestic Minxes (check out their blog! They’re good, those minxy girls).
This was three coats, no top coat. It is sheer, but has great formula and builds fine. Possibly some VNL at three coats, but hey. This is me, right? Top coats are going to happen, right? Oh yeah.

Next up was one coat of Julep Melissa (thanks again, Megan!). I love this polish for it’s ability to transform any other polish – in this case it stayed a subtle colour, but had that green pop.

Julep Melissa over Kleancolor Frappachino
Then one coat of OPI Turquoise Shatter, and top coat (Orly Sec’n’Dry) – because, remember Ami’s Rule One of Shatter/Crackle: Use Top Coat.

And that was it for a little bit – I did some dishes, and it wasn’t dry, and the polish got all munched. I smooshed it all back into place and decided to add MORE to cover the wrinkles. (Wrinkles are LOVELY on people. I think it needs to be said until we all believe it and stop throwing our money at suited smarmy marketing people).

Smoooshed nail polish!
I wanted to add visual interest and colour shift, while disguising the wrinkles, and not covering the shatter and underlying polishes. I did take photos of each step, but the lighting was so bad I can’t use them.
But the layers were:
- L.A. Girl Glitter Addict in Nostalgic – one coat
- And then a coat of Kleancolor Chunky Holo Purple – which added that gorgeous purple colour shifting sparkles to the whole nail. It pretty much set it on fire. Impressed I was.
- And then last, but not least, was a layer of Australis Speck-tacular flakie polish – why? Because I could. Also, adding the flakies will mean that this mani should look good in every light. And it does, yay!

Topped off with another coat of Orly Sec’n’Dry. I’m really happy with this! Its pretty thick, yeah, but then it’s 9 layers of polish. So fair enough. Its not that garish – and although I do have a soft spot for garish, I like that even with 9 coats of polish it’s not.
 And a whole-hand shot…

Afternote: I had lots of compliments on this polish ,which was strange as I dont expect people to notice. I think it was the textured / crackle look, people still seem fascinated with that. Me, I still dont really like it, so that was my biggest challenge here – find a way I can wear it!
Thanks to anyone who made it through this post, and have a great day 🙂
Essie Sew Psyched – Swatches
This is Essie Sew Psyched, and my first experience with Essie. I bought this one at a big cosmetics sale for $8 – normally I wouldn’t buy Essie polishes because they are owned by L’Oreal who test on animals, but: a) the parent/child company and animal testing area is a bit of a grey one – PETA encourages us to spend money at the non-testing child company to prove a point to the parent company that testing is unecessary. See, I think that’s a touch naive, but… then there’s: b) it was a really pretty colour. (shame.)

Sew Psyched has a really pretty silver microshimmer to it – which I can’t see AT ALL on my nail, but I think it does add a bit of depth to the colour.
These swatches are two coats, no top coat. This polish had a thinner formula than I was expecting, with the odd rampaging blob of polish – watch out for those. It self leveled well, and was nice and opaque in two coats. Good wear time, minimal tip wear the next day. I’d describe the colour as a lovely blue based khaki green, and it was fairly flattering on me.

Sorry about the cuticles! Big day of swatching 🙂
Whole hand photo… it’s not a weak colour, but it is quite subtle.

Then for fun I used top coats of Darling Diva Polish – Dreamy, Australis – Speck-tacular, and Cover Band – Sticks and Stones over the Sew Psyched (little finger Speck-tacular, ring finger Sticks and Stones, middle and index fingers Dreamy). I really preferred Dreamy as the finish. The holographic top coats’ silver tone turned it into a very grey sage green, and Sew Psyched really amped up the holographic sparkle of Dreamy. ( I like it so much so that I’m wearing it as a pedicure…) Sticks and Stone looked nice, and would be great for a camoflage effect, and Speck-tacular just didn’t really impress me over this colour.

Shade photo

Shade – the flakies look so nice in the shade
Whole hand photo with the top coats.

Look how nice that holographic looks in the sunlight! And how invisible the flakies are… 🙂
After this first experience I’m pretty happy with Essie – it did dry fast, and removal was easy – it didn’t stain either. Unless its at a mega sale I won’t be racing out to buy more (apart from Smooth Sailing, maybe. I WANT that polish.)
I don’t think the big cheese parent companies give two figs about where they get their money from, as long as they get it. The concept of buying from the non testing child company would only work if we didn’t buy anything at all from the main company, and if they stopped selling in China (or China changed that animal testing pre-requisite). I don’t know if that’s going to happen. But I do love this polish, yessir.
OPI Color So Hot It Berns – Swatch
This is an OPI mini from the Swiss Collection Mini Set – my sister V (yay! Sister V is getting into nail polishes! WHOOOOP! Come on, Sister C, it’s yoouuurrr turn!) bought the set and realised she won’t wear red, so she gifted this cute little bottle to me. Twisted my rubber arm to take it. hehe

OPI Color So Hot It Berns
This is.. well, I’d call it a standard red creme polish. Nice shiny finish, self levels, easy to apply and this is two coats – no top coat. Only used a smidgeon out of the bottle for a full manicure too, so even the teensy bottle will last awhile.

Super cute teeny bottle!
Pretty colour! More to the primary/slightly blue toned red spectrum – not orange/pink/coral toned. Cool red. (oxymoronical, I know, but there you are).

So I put Dreamy (the holographic top coat from Darling Diva Polish – check them out on Etsy) and Australis Speck-tacular (the flakie top coat) on top, too see what that looked like. Now the nails with Dream on top are pink. Indoors, they are REALLY pink. Dreamy has a silver tone to it, because of all the different holographic particles, so be aware that it will affect the colour of the polish. Out in the sunlight it was a pretty red holographic, still pinker than before, but inside – very pink. Quite a cool effect, but I’m not sure how in love with it I was.

little finger and middle finger has Australis Speck-tacular, ring and index fingers have Dreamy – please forgive the too-much-swatching cuticles!
Shade – I love it how the Speck-tacular (terrible name!) flakies show up better in the shade – the opposite of most cool top coats. Adds interest in the lower light, which is a nice change. The flakies are also multi-coloured, so you’ve got the pops of orange or blue or green – the red obviously doesn’t show up as well against a red base, but the shimmer still shows.

Whole hand photo…

Invisible flakies in the sun, pretty holo sparkle! I might layer them up next time, see if I can get a all-light-level effect 😀
And there you have it! OPI So Hot It Berns from the Swiss Collection, with spinkles on top. Thanks, Sister V!
Coral Colours Magnetic Nail: Brass Pole
This is Coral Colours Magnetic Nail in Brass Pole – bought from a Unichem Pharmacy in Feilding for $8.99. Pretty goldish green colour with large gold shimmer. The magnet is set into a removable band, which is a giant PITA. The best way it worked for me is to leave it done up with the little butterfly flaps and use that to hold the magnet over the polish. Really close to the polish.

I found this very hard to get to work properly the first time around, the instructions say use one thick coat, but that often didn’t work, and one coat wasn’t enough to cover. I tried the one coat, then one THICK coat, and it seemed every second nail needed a third coat before the magnet would grab. I even tried to put a bigger magnet behind that one to increase the pull, but that didn’t work. This time around it worked better, little finger nail and ring fingernails had one thick coat; middle and pointer have two.

Shade…
However, it was all worth it in the end, the magnet gave a really pretty effect and had quite a few nice comments on this manicure. I didnt put on top coat and this was ROUGH. Glitter rough.

sun…
Timing – I held the magnet over my little fingernail for 15 seconds, and its not defined enough yet. The others I tried 20 seconds, and that seemed to work well. On my first attempt the magnet pulled the polish right off my nail after 30 seconds, but I couldn’t get it to happen again this time. 😀

Then in town I bought a Australis multi-coloured flakie top coat (yay!) called Speck-tacular and I put that on. Gave a subtle flakie flash when the light hits it, and smoothed out most of the gritty feeling. However, the gloss also made the nail polish look quite flat, so now I feel like I have tiny grilled paninis on my fingers 😀 I’ll try it with a clear top coat, and see if it retains the corrogated effect.

Brass pole with flakie top coat
Brass Pole dried quickly -as did the Australis top coat, which I bought from Farmers for $14.

Australis Speck-tacular
These polishes also lasted really well, with no tip wear at all the next day. I love the colour of Brass Pole, and how close the diagonal stripes are together are from the magnet: they do help elongate my stumpy nails. I wish the magnet was stronger, so it could do more than just the center of my nails, but overall I am very happy with this polish.
Australis Lip Gloss: Laquered Candy
Here is last weeks impulse purchase: Australis Ultra Shine Brush-On Lip Gloss in Laquered Candy. Whew that’s a long name. If I ever make any makeup products, I think I’ll name them something like ‘Bob.” Much easier to type out.

Anyway! I bought this because it was $2. And I like the few Australis products I’ve tried, and I’m addicted (mentally, not physically!) to lipgloss. But mostly because it was $2. It’s a sheer pinkish berry shade, no sparkles, and has a cute brush applicator (as the name suggests!).

It doesn’t smell like candy to me, much more like berry jelly, sort of generic berry + sweet. Nice enough. The colour is almost non-existant on, just a wash of super shine. Its not sticky in the slightest, and it wears off really quickly, but it’s nice to have on hand for touch-ups.

Australis state on their website that they are against animal testing: (http://www.australiscosmetics.com.au/about-australis/our-story). Though, maybe its just me being cynical, but I would rather people say “we do not under any circumstances test on animals in any stage of the production of our product”… because otherwise I feel that they may be testing like someone’s evil Mother in Law, but are a bit embarrassed about it. I hope not! Honesty in advertising would be REALLY nice.

