Blog Archives
Handmade Nail Polishes: Glitters in Jelly
The final section of our handmade polishes, these are all jelly based polishes with loads of glitter. One is a franken (mixed from other polishes) and the other four are completely handmade, using the Joss suspension base from Beautyworld Australia.
*Testimo Franken – this was a sheer peach/pink with iridescent micro glitter: I added silver and gold mixed shape and size holographic glitter, copper hex glitter, and blue circle glitters.

Photos show three coats, no top coat.

This is insanely glittery, and looks sort of like fish scales, but prettier. I really, really like it!

*Misa Pink – just using the empty Misa topcoat bottle, this is another handmade pink and glittery polish. Deeper pink, this time! Again, multi sized holographic gold and silver glitters, as well as quite a few silver holographic butterflies.

Photos show two coats, no top coat.

I’ve had a few nice comments on this polish, which gives me much happy.

*Orbit – deep berry pink jelly with small red, medium fuchsia and huge light pink circle glitters. There’s a touch of pink/red shimmer in this too, to add some depth.

Three coats here, no top coat

I found the large pink glitters sank to the bottom really fast, I had to shake it up between each nail, which was a bit annoying. Still, in the end there were plenty per nail, and that was good. I may throw a few extra glitter bits in, the advantages of making it myself!

*Blue Moon – silly name, perhaps! Royal Blue jelly with small blue circles and large blue circles with a few pink circles thrown in for interest.

Oh I love this. Though I kinda wish I’d named it Whale Farts. It may have a name change in it’s future… doesn’t it look like giant bubbles in the sea? 😀
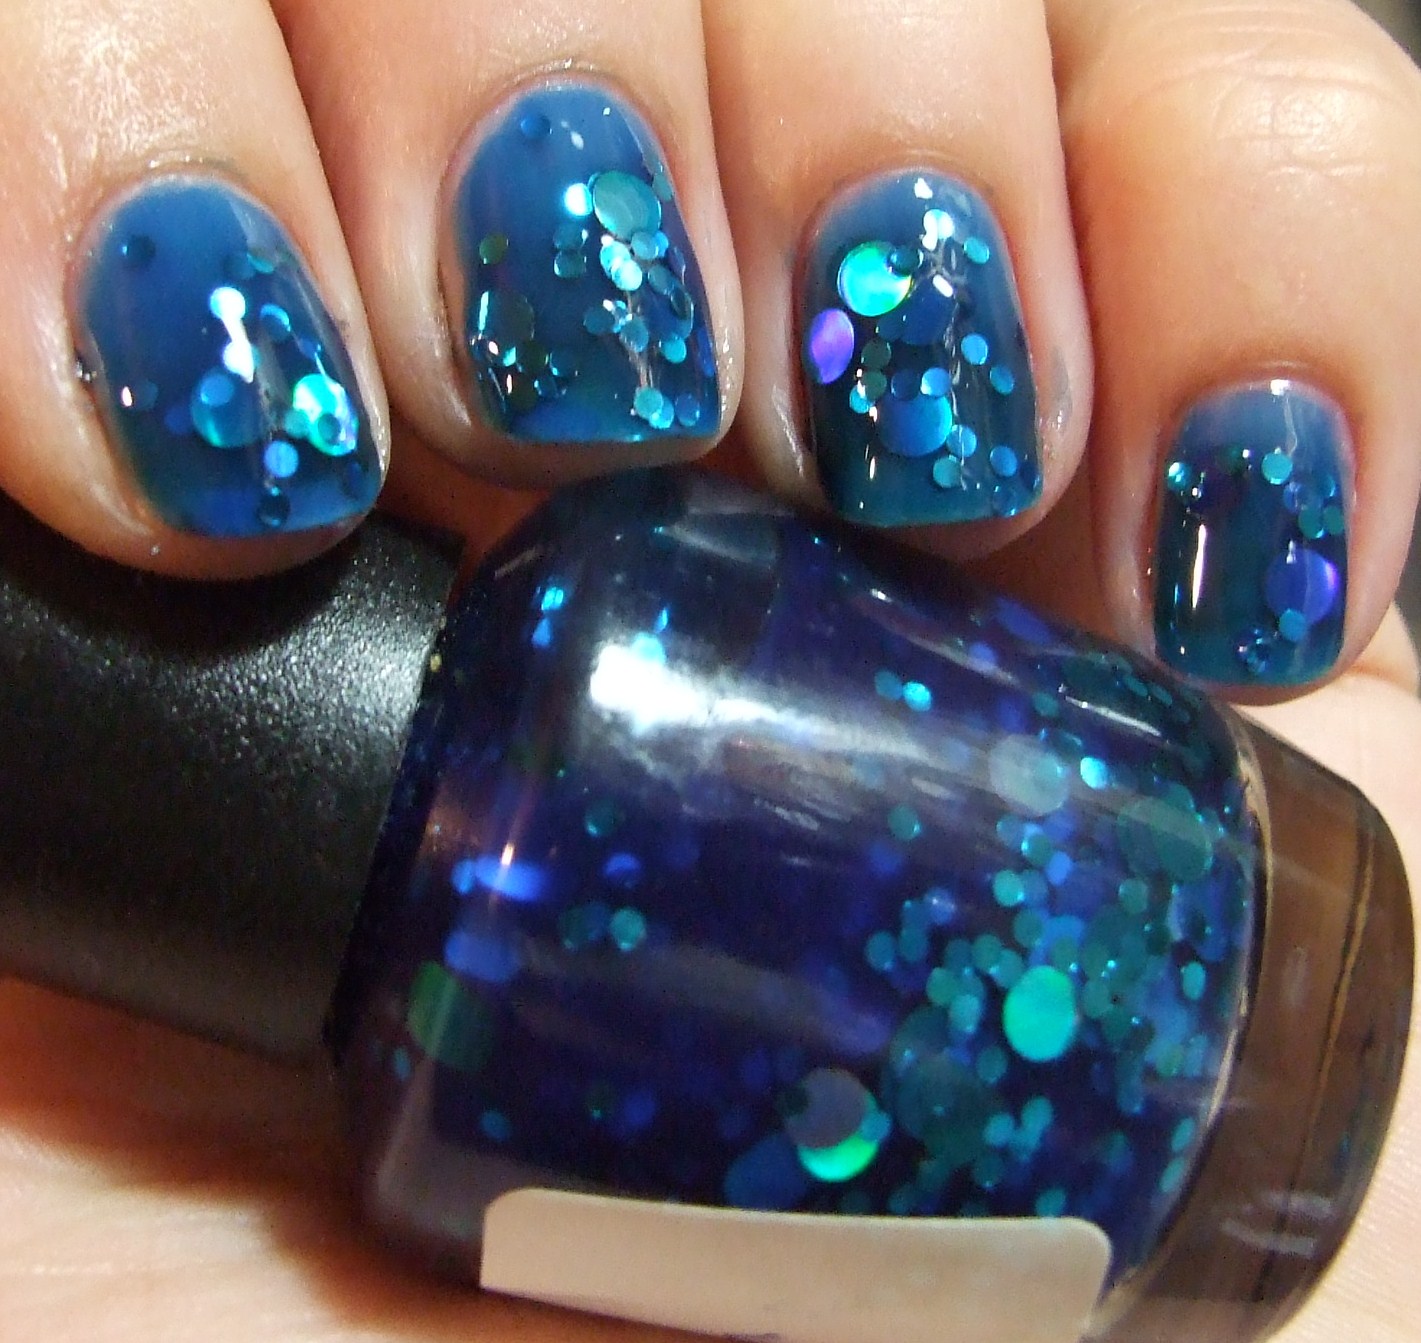
Three coats here, and there is still visible nail line, but all of these can be layered over anything, really. I like the really deep, almost resin, look, so I’m happy with this. Never thought I’d be ok with VNL!

And another photo because I just couldn’t narrow these photos down too much. The glitters lay flat, so they were pretty smooth to the touch just with normal top coat (though I don’t have top coat on here).

Macro

*I Heart Hades – Black shimmer/jelly base with red holo hexes, red squares and large red holo hearts.

Three coats here, I did have to do some fishing to get a heart out, again, may just add more.

This could be layered over black, but I do like the half hidden, layered look of this at three coats.

If I may indulge in a self-congratulatory moment, I’m really happy with these polishes! I’m super impressed with the polishes my mother has been making, she’s really branching out and playing with glitter, even – and when her current busy period is over hopefully she’ll be making more of the pretties again; meantime I am treasuring the ones she is making, because, well, they’re awesome.
Thanks for reading, have a great day!
Ami 🙂
Handmade Nail Polishes – Shimmer Edition
Basics – these are polishes my mother or I have made in our polish make-athons, all swatches shown without base or top coat. Some are experimental only, and we’d have to retrace our steps to reproduce them, others have the recipe all written down – those ones are named 🙂
White & Red – I don’t know what this is called! It’s a pearl-white polish with loads of red shimmer throughout.

2 coats on it’s own, pretty, subtle and work appropriate.

Then one coat over Kleancolor Black – maybe if you have a steady hand this would look nice. As it was, I could only see the uneveness!

Ugh
Pink/Mauve. Or should that be Pauve? This is a proper franken, started with Revlon Sheer Pink, added a touch of a $2 shop pink, then went mad with spectraflair and tint.

2 coats, easy to apply and fast drying, nice soft linear holo effect.

Pansy – Intense reddish purple, with various sizes of holographic glitter and shimmer (small and tiny and tiniest!)

2 coats, bit patchy but applied easily and would be even in 3 coats.

This one is more colour accurate! 😀
Neon Spots – glitter top coat, matte neon glitter and large black circles, large matte green and purple hexes.

One coat over 2 coats of Pansy. Nice combo!

Pale Blue Shimmer – scattered holographic and multi-coloured shimmer.

2 coats, no top coat. Very pretty, a soft blue.

Greener Bronze – bronze colour with copper sparkles. I was experimenting with the idea of copper and the way it tarnishes, here. Didn’t quite get it!

2 coats. A touch streaky, and the shimmer is so strong that it was hard to see the copper mini glitter.

Golder Bronze – bronze colour, more gold, obviously! – with copper and green micro glitter.

2 coats – seriously thick! Needs thinner stat 😀

Browny Holographic – slightly red toned brown with large amount of holographic shimmer.

2 coats, nice formula, nice soft linear holographic effect.

Red – tomato red shimmer, slightly deeper red than the photos show.

2 coats, lovely formula, very shimmery!

Berry Red/Pink – gorgeous polish, either a pink toned deep berry red, or a raspberry pink with strong red interference. Glass type fleck/shimmer which changes red/pink/gold at the edges.

2 coats, very very nice formula.

Purple with Brown – deep purple with brown interference (brown shimmer appears to float on the surface of the polish).

1 coat, this is SERIOUSLY thick! Lovely colour, very unique with the brown shimmer.

Note to self, wear two coats of base polish, this stains – that aside, this is one I KNOW I’ll be reaching for, very soon!

Have a great day
Ami 🙂
Handmade Nail Polishes – Shimmer & Glitter Edition.
It has been quite some time since I showed some of our polishes, and they’ve been steadily mounting up during that time. Here is the lot I have to swatch!

That’s a lot of fun right there. I’ll break it down into separate parts though, as no one wants to spend a million years looking through all that, including me! These ones are the shimmer polishes with glitter 🙂 No base or top coat on any of these, and the bases and most of the dyes and pigments came from Beautyworld Australia.
Winter When Autumn Leaves – burnished orange shimmer with gold, red and copper hexes.

2 coats, nice formula. I’d love a few more glitters in it, so they distribute a bit more evenly, but I’ll remedy that in the weekend. 😀

Red Shirt – plummish-red shimmer with red and gold circle glitter, and silver and gold multi-sized holographic glitter.

2 coats, nice formula, easy to get a good coverage of glitters.

Brown Trousers – auburn brown, slight holographic shimmer which adds a grey tone as well – red and gold circle glitters and gold flakes.

2 coats shown here…

I enjoy the addition of the sprinkling of holographic powder.

Fog People – smokey grey with gold and silver holographic glitters of different sizes.

Slightly sheer, but means that the glitters aren’t buried in this one. 3 coats

I love this polish!

Sunny Day Rain – sheer pale blue with blue circle glitter, gold, silver and copper glitter (including holographic) and large holographic gold rectangles.

Very thick, but if I thin it, the glitter will probably all sink to the bottom in a slow and terrible way. 2 coats above, then layered 1 coat over 1 coat of Kleancolor Sea Ice.

I did have to fish for the large golds, but could get them out without deep sea dredging.

Blue in a China Glaze bottle – Mid blue shimmer, with blue circles and turquoise shreds.

2 coats, very easy to apply, fast drying.

Pretty Pickle – sheer green base, large matte green hexes, small holo lime hexes, teeeny tiny emerald flakes.

3 coats, was pretty much opaque in three. Would also be nice to layer over a base colour.

Rime of the Ancient Mariner – this is my Sister V’s polish, based on these lines from the poem: I won’t say what’s in it, or she’ll have to kill me. 😉


Holographic Nail Polishes Made by my Clever Mother: Part Two
The second part of this rainbow of gorgeous polishes made by my super clever mother 😀
Fuchsia pink:

These photos show two coats, no top coat.

This is such a vibrant pink with a very slight orange duochrome effect in the right light. It’s not as deep a colour as Raspberry Sherbert, but along the same lines.

The formula on this was lovely, but some of the polish would come screaming down the brush at random intervals, and painting the first few nails was an exercise in reflexes. After those it settled down, and this had the best coverage of the lot, only needing those two coats. Dry time was really fast as well.

Gorgeous holographic effect and shine

Teal:

3 coats here, no top coat.

This one was a bit sheer, but a lovely teal – aqua colour with a nice holographic shimmer.

I noticed a slight green duochrome in direct sunlight, too!

Marine:

3 coats, no top coat.

This shows on the nail as a dusty denim type blue, with a slight teal tinge.

Nice strong holographic effect, no duochrome though.

Very pretty and flattering on my (olive based) skin tone!

Blurple.

3 coats, no top coat.

This one was a bit patchy and sheer on the first coat, but leveled nicely on the second, I preferred the depth at 3 coats (shown here)

Oh my goodness. I ADORE this polish.

I think my mother thinks that she is getting this polish back, but in fact she’s NOT. I’ve claimed it as payment for all the swatching heh heh heh heh

This polish is very fast drying, with a lovely strong holographic effect.

All of these polishes (and the Part One polishes) were made using the Joss Suspension base from Beauty World Australia, and holographic flakes, not spectraflair 🙂
Have a creative day!
Ami
Holographic Nail Polishes Made by my Clever Mother: Part One
My lovely, talented, and super clever mother popped over to see me on Saturday. “Hi!” She says. “I had a bad day on Friday, and thought I should clean the house and burn the bad mood out productively. But instead I made nail polish. See?”
What a good plan. You should have SEEN my face as she pulls out 8 holographic polishes, and plonks them on my table. Because there are so many, and so many photos needed to be taken, I’ll split this into two lots 🙂 Here is the whole range…

and I split them into warms and cools – well, white, grey, gold, and the light pink here in part one; and fuchsia, teal, marine blue and blurple in another post. 🙂 All of these polishes were made using the Joss base from Beauty World in Australia, and holographic flakes, as well as the Joss tinters and a bit more besides 😉
So, first, White. And WOW.

I adore this colour, it’s ethereal and flattering without being wishy-washy. I do want it to have more holographic shimmer to it, but that may be tricky without altering the base colour. This is the least holographic out of all 8 polishes.

These show three coats, no top coat. Check out that shine! The shimmer looks silver in most lights, but you can see a subtle scattered holographic effect in very bright light.

This reminds me of feathers, in some way… just so soft and pretty.

Next is this gorgeous grey:

And it is a grey, not a silver. It’s seriously pretty, and VERY holographic.

3 coats, no top coat. Super shiny, and again, flattering – no lobster hands here!

Dry time was nice and fast on this one too 🙂 I think it would make a kick-butt holographic top coat!

Gold / Yellow.

I don’t know if this one is gold or yellow – or both! It looks yellow in the shade, and gold in the sunlight. 3 coats, no top coat.

It was sheer, and there was some VNL even at three coats.

This has a medium level scattered holo effect, which flicks towards the green end of the rainbow spectra. I want to try this over black at some stage!

Dusty Rose

Sunlight…

2 coats, no top coat. This polish had a slightly thicker formula, went on well, and dried super fast.

It’s also the nicest Nana colour I have seen 😀

See you in a moment with the next installment!
Ami 🙂
Handmade and Franken Polishes – random assortment
More! Yes! We love making these, and I love sharing them, and having a record of what we made.
This is a beautiful red jelly with glitter polish that my gorgeous mother made just for MEEEE!

My nail isn’t in the best shape, but the polish itself is gorgeous. Glossy, smooth, pretty quick drying. This is using one of the red tinters from Beautyworld, in Australia

It is still sheer, this is three coats, but I could layer it if I wanted. I do love how streak free it is!
And here’s another crelly glitter polish I made – I think it’s pretty cute. My ring finger only has one coat of polish – I could say it was to show you how it builds, which is PARTIALLY true – but it only happened because I hit my hand on something and took my polish off, so thought I’d take the opportunity. Clumsiness – my middle name 😀

Three coats, China Glaze Fast Forward top coat. This does need a bit of thinning, but I really like the soft pastel effect 🙂

This looked all soft and squishy… and sadly, it was! There is a ding on my index nail too… whoops.

Then I layered two coats over Kleancolor White, and it looked a lot more stark white, but was easier to work with, and the pastel glitters stood out really nicely.

I love the shine!

I sort of feel bad about this next one. This is a cool polish from Mmmmm Nails, called The Boy Who Broke My Heart. And I love the concept, the large glitters in a clear base with small silver and iridescent glitters, but.. there wasn’t ENOUGH big glitter in it!

So I added more. More matte black circle, holographic butterflies, black hearts, and medium sized green circle glitters. I do think this needs some more mid sized glitters though, it seems a little unbalanced, glitter size-wise, to me. This is one coat of The Boy Who Broke My Heart – upsized – over Nfu Oh 67.

And last but not least, here is another upsized polish: Jordana Lilac Hearts, plus MOAR glitters.

The gorgeous Danielle gifted me this for Xmas, and when I bought some glitters I just KNEW they’d work well with the lilac hearts and cute little iridescent glitters of Lilac Hearts.

Here I’ve layered one coat over China Glaze Gaga for Green – and it reminds me of a garden. Absolute love. I think this would look lovely over quite a few different base coats, too! Thanks for getting this polish for me, Danielle! I hope you don’t mind that I put more in it, but I love it sooo much like this 😀

I do really like the base of the Jordana polishes for suspending big glitter, they just don’t seem to sink at all!
Have a wonderful day
Ami 🙂
Our new polish creations, using some great new Joss products! MANY photos.
Very recently my mother and I (mostly my mother!) bought a whole bunch of amazing products from Beautyworld Australia – as they’ve been able to jump flaming hoops, wrestle paperwork dragons, and defeat mountains of legal requirements in order to be able to ship dangerous good internationally. And by dangerous, I mean, pretty polish related goodies: suspension base, spectraflair, thinner, and dye for nail polish. We are still using an alternate suspension base, but I am really looking forward to using the Joss base again; it’s cloudier but dries clear, and smells much nicer 😀
This is a long series of polishes my mother and I have made in the last few weeks, using the new Joss products, and some solvent resistant glitters I have sourced from Glitter Unique and You Mix Glitters. I love the dyes! With them we make JELLY polishes. And their pigments are so gorgeous, we’ve really only just scratched the surface of all the pretties we can make with these!
First up: Denim and Sequins, a polish I made – blue jelly holographic base with blue circle glitters.

Being a jelly it takes a bit more skill to get the layers even, and I sometimes lack this skill – hence the reason my index fingernail is lighter in colour than the others 😀

I do like the way the glitters shine through the jelly layers in the shade, and the scattered holographic glimmers in the sun. All season win!

My mother made this gorgeous polish, and I’ll happily admit I wish I had made it.

She tends to gravitate a bit more towards the pink and red colours, and this one is a beauty.

This is RS – I do have to ask what that stands for. I’m going to say it means Raspberry Sherbet, because that’s what this reminds me of! These photos show three thin coats, and China Glaze Fast Forward top coat.

It’s SUPER shiny on it’s own, and dry time is moderately quick, but I don’t have time for moderately quick, so on went the top coat. This is a bit sheer, but the depth at three coats was just gorgeous, and there was very little VNL.

Look at the holo! Look at that shine! The colour was gorgeous, and has that slight red duochrome that some of these deep pinks can – on certain angles this was red. I’m not sure if it comes through in the photos as well, but it was definitely there in real life.

And here’s a couple of pastel glitter pretties that ended up being a much different colour than my sample was! This happens often, sadly – and also happily, because I do usually really like the ‘accidental’ colour, and I can always try again for my original concept 😀

shade
This was supposed to be much yellower, but I overdid the small emerald green flakes, and it changed the look completely. I love it though! It does need a few drops of thinner, which I’ll do soon. This is three coats, with a thick top coat.

sun
And a comparison with the second bottle – I was colour correcting this back to a yellower base, but they do still look quite similar in the bottle: I did add some different glitters to the matte bright coloured glitters in the original, including some gold circle glitters which I love.

shade
This shows that circle glitter better – and the contrast between the soft pastel yellow and the lime-ish green. Three coats of both, with the thick top coat.

sun
And here is the yellow on it’s own, I really like this one. I love the other one too, but I just prefer this one a tiny bit more, with it’s gold glimmers and flakes. My index and ring fingers have three coats, little and middle nails have two coats. All have the thick top coat 🙂

shade
I must say, I adore the liquid dyes from Beautyworld. They have a really pretty effect, and the colours are gorgeous. They are quite thick, as are the all the pigments we’ve ever bought, which is why a few drops of thinner helps. It also means that only a small bit of dye or pigment is needed, generally!

sun
And here is a purple my mother made, from some of the Beautyworld pigments. It also needs some thinner, which I personally quite like doing because you get MORE polish! heh. heh. heh. But here are three coats, no top coat. It was plenty shiny on it’s own!

shade
Stop looking at my little fingernail. I told you I needed to thin it down, ok? 😀 It has quite a complex shimmer, this polish, which is also moderately subtle. The colours are all there, but they don’t leap out and smack you between the eyes.

sun
Unless you layer it over black, of course. This is one coat of the purple shimmer over one thick coat of China Glaze Liquid Leather. No top coat.

shade
It was a tiny bit brush-strokey, which again would be fixed with thinning. I love the richness of this purple over the black!

sun
And this polish is called Corrina’sOoh – odd, I know. But I was mixing up some polish ideas and I showed my NOT polish addicted sister them and she was pretending to be impressed. Until she saw this one, and I got the first genuine “Oooohhh!” from her. So I made a few, and gave her a bottle, and strutted around like a king 😀 A female king, that is. The strut would remain the same.

shade
I’m going to thin this one down a tiny bit too, but I so adore the colour and shimmer. These photos show two coats, no top coat.

overcast sun…
And finally, a couple of quick photos of a glitter top coat I made – multi sized and shaped glitters in gold, silver, and gold and silver holographic, in a clear base.

Really sparkly and pretty, I have since used this glitter topper over almost everything! This is one coat of the glitter over the two coats of Corrina’sOooh.

And there you have it! A whole bunch of new creations, all except Corrina’sOooh were made in the last two weeks – we are having such a lot of fun. This weekend I have planned how to make the polish Sister V has been asking for, so fingers crossed I can make that work. Have a great weekend, everyone!
Ami 🙂

