Blog Archives
piCture pOlish Collab-Fest 2013 – Geode :)
Jules and the wonderful team at piCture pOlish contacted us all with the idea of a day where we all post our collaboration shades again, this time on the 16th December. Which is exciting, because I like wearing my polish 😀
This time, instead of just wearing it as it was I thought I’d jazz it up a touch. For reference though, this is Geode on it’s own, at three coats and top coat. The original post is here 🙂

And this mani was inspired by More Nail Polish, though a pale imitation – she used golds and shells and wow. I used Geode as the base, and then Orbit (also by piCture pOlish, it’s opaque for this in one coat, always a bonus) along the sides.

Then I added striping tape strips, and medium and small gold dome studs.

I did like the vertical stripes, very much! Not the horizontal ones so much. Future reference Ami… horizontal stripes are not flattering on your nails 😀

But it was nice to try a bit of nail art, and to put this polish back on! It’s a polish made for summer with those teeny holographic flakes. And, yay, SUMMER!

Also, yay Festive Season! I did use a few festive props and settled on this photo, but seriously, happy season to everyone, however you spend or celebrate it!

You can buy this polish through the piCture pOlish website, check out their everyday deals, and also their network of people who stock their polishes, there may be something close to where you are 🙂

*no roses were harmed in the photographing of this polish*
Have a wonderful day!
Ami
New piCture pOlish collaboration shade: this one with MEEEEEEE!!!!
Hi everyone!
This post has been about a year in the making, and I am about a years worth of excited about it :D. In last years blog fest I (along with quite a few others) won an opportunity to make collaboration polishes with piCture pOlish. Ooooh the happy dances were danced at my house that night, my friends! Picture! This is the final product, right here.

A bit of back story, this was not my original idea. Sadly, my original idea could not have been made due to lack of critical ingredients, but Jules (and the girls) could not have been more lovely, and together we nutted out a second idea. I wanted blue, she suggested a glitter, I leapt at the chance, and after a few to’s and fro’s, this is the one we came up with 😀

My husband suggested the name as I was totally stumped for ideas. The polish makes me think of eggs, says I. Magical eggs. Perhaps even a gemstone egg. What shall I call it? And lo, he turns to Mr. Google, types in “Crystal Egg”, and out comes “Geode” 😀

Here is a geode! It is, basically, a hollow rock with a crystal formation on the inside. They are also stunningly pretty. And I think they suit this polish! Not the colour, which to me is more birds egg colour, but if there were a magic bird that laid eggs that looked like this polish, they would perhaps be geodes 😀

Ok, whimsy aside, details! The photos show three coats, and top coat. Originally the formula was a little thicker and suspended the glitters throughout, but there was some slight streaking issues due to the thickness, so the formula has been tweaked, and this will now need a bit of shaking before use to get those glitters evenly distributed. If you have ever used a glitter polish you’ll know the drill, it’s pretty standard. 😀 The best bit is, this isn’t even a tiny bit streaky, this is smooth 🙂

The base colour is a lovely sky blue crelly (creme and jelly mix) so the glitters show through nicely, but not your nail line. There are medium sized royal blue and mid blue metallic hexes, smaller gold hexes, and a heap of teeeeny tiny silver holographic flakes smaller than the normal flakes, invisible in low light but they dance happily in the sun.

Dry time of this was very good, I used Poshe top coat and it was super smooth and glossy to touch.

The little silver stars are a metal decal, pretty but a pain in real life, they stick out past the top coat.
I still have to pinch myself to see if this is real, what a fantastic opportunity to work with these talented nail polish creators! I am beyond happy about it 🙂

Please do check out their website, here , they have great Everyday Deals too, and their Facebook page is chocka full of amazing photos of their polishes. Other places you can go to check them out? Sure! Twitter, Pinterest, Instagram, You Tube and Google + 😀
Thank you so much for reading, I hope you like our polish, and have a wonderful day!
Ami
Swatche spam: indies, textures, piCture pOlish, etc
L.A Girl Sand Blast in Quicksand – 3 coats, no top coat. I bought this from Cherry Culture, was delivered in a week, pretty good going!

This was my first textured polish that didn’t have glitter, and I’ve been a bit scared of them, to be honest! The light coloured ones look like some kind of fungal infection of the nails, to me 😀
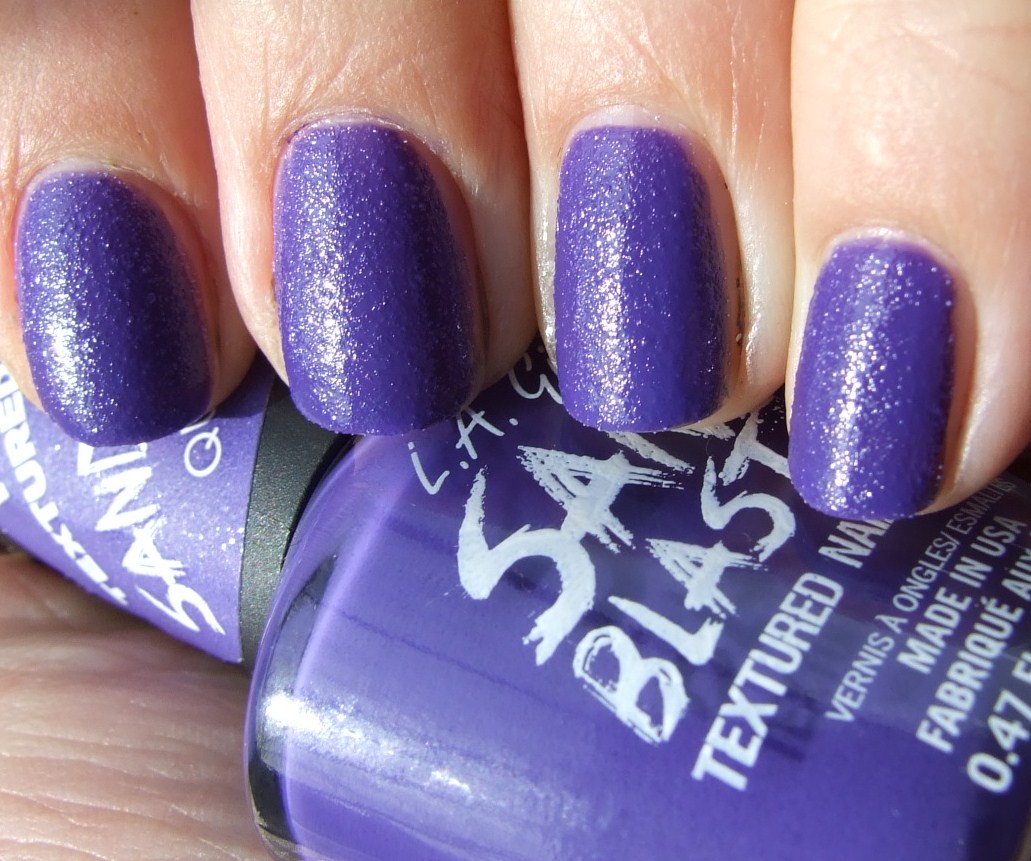
But.. this purple is a gorgeous colour, and I really like the polish!

OPI Liquid Sand in Alcatraz….Rocks!

This was the one polish from the San Francisco collection that I wanted, and I couldn’t find it anywhere, and then I bought it from Beyond Beauty, yay! Postage is so fast too, I bought three from them on one day, they arrived the next. WOW.

This is a purple base with loads of different colour microglitters, I mostly see a more violet toned purple, gold, and blue.

So blingy and pretty, I’m glad I got this!

piCture pOlish o’hara – from my recent PP haul from their website here. They have amazing Everyday Deals too, so I got one of these polishes (denim) for free, and that’s just amazing 😀

o’hara is a pink toned red with piCture pOlish’s famous holographic mini shards – they aren’t glitter, and they don’t stick out, and removing them is as easy as any normal creme polish.

This was a polish I put on when I hit my recent art crisis, it’s times like that it’s nice to be able to put on a good blingy red and just get stuck back in!

The next textured polish I tried was L.A Girl Sandblast in Sandy Beach, the most awesome blue coloured polish.

Only… where is the texture?

This just looks bubbly! But hey, dried fast and with top coat it’s a beautiful blue polish, no harm done 😀

Ninja Polish Eye Candy… a really pretty glitter mix of gold, purple and teal, or is it green and blue? Unsure. PRETTY! I am sure of that 😀

Hows this for blurry sparkle?!

One coat here over Star Kin Ink, with Poshe top coat (accent nail is Ink on it’s own)

So blingy and cool, and actually really easy to remove in this mani!

Ruby Wing Wild Flower

This.. is three coats. This is possibly one of the ugliest polishes I’ve seen in quite some time 😀 I like the green shimmer, but the inside colour looks like the colour my nails go when stained! And it’s sheer. And, just, ew. Maybe I’ll layer it over a nude colour and see if it’s better without the VNL, but I was suffering with this on, and I had to keep it on because there was no sun and it needs sun to change colour ARGH! First world drama llama!

– topped with Mmmm Nails (lost the name, but has lots of yellow daisy glitter and small yellow glitters).

Then, at last, a small ray of sunshine! And I mean small, this would probably change a lot more to the orange if there was more sun. But hey, done, and OFF IT CAME!

And lastly for today in this mega post, is KB Shimmer Spring Training, which I bought through Harlow & Co. I really like that site, postage has gone up a bit but it’s still fairly reasonable, especially compared to other indie stockists, but I have noticed their processing and shipping has slowed down a fair bit, to about 3 weeks. They are still good though!

Ooooh. and AHHHHH.

Two coats, and top coat. SO pretty. I think it’s supposed to be scented but I’ve had mild hayfever, so can’t really tell.

But I do love this polish, so easy to apply, so many small and pretty glitters, such a flattering colour. Love! KB Shimmer people, please send me all your polishes? I would give them such a loving home!
Have a great day
Ami 😀
Nail Art Stuff
horseriding mani!

Pinky: Nfu Oh 67, 3 coats. Ring finger Color Club Pardon my French (I think, no label!) stamped with some horses from my first ever proper stamping plates, whee! Stamped using a-england Excalibur, and BYS Black Satin. Middle nail has a franken pink holo with silver blings, and ring finger and thumb have Star Kin (ours, yay!) Grayceful.

And then, winter happened, and no horseriding. Poos. But it’s funny because some of these horses have no heads. Not the stamps fault, my fault, but it’s great 😀

Winter mani – all except accent nail: Coral Colors Jayded something (no sticker), stamped with Color Club Worth the Risque – aiming for a frozen, icy lake effect 😀

Then my accent nail has two coats of Boe Beauty Red Hot polish, which is sponged with Cult Nails Annalicious and Nfu Oh 74 , then stamped with BYS Black Satin for the outline of the fire. The ‘sparks’ were sponged on Vivid Lacquer Pumpkin Hangover.

Sad Panda Nails: Three coats of Boe Beauty Ballet Pink, stamped with panda stamps, and bamboo.

I’ve started using a sticky stamper, which is silicon and very sticky and works brilliantly, BUT… it falls out of the stamper, and then when I use it on it’s own it distorts the image. I’ll glue it in, I think, I really like it, just to get around that design. 🙂 The green is China Glaze Jolly Holly, the black is China Glaze Liquid Leather, I have two black blingies for the panda’s ears on my little fingernail, and it’s all topped off with L.A. Colors Rapid Dry top coat.
And a stronger stamping pattern, using China Glaze Liquid Leather again as the black stamping polish, and Mmmm Nails Between the Buns (that NAME!) as the base coat.

I loved this… so much it was still on my nails two days later. I KNOW. 😀 It reminds me of very elegant curtains. Yes. I do love it, I keep looking at it, I think stamping over a multichrome nail polish will be a win for me, as can’t lose with a multichrome anyway.

And another quick one that was an attempt to unfug a polish – Zoya Akyra, just a weird colour on me. I stamped fish on my nails, using A-England Excalibur, and green ‘water weeds’ using A-England St George (too faint to see, sadly).

And added a nice coat of piCture pOlish splash for added aquatic effect, plus top coat, MUCH BETTER!

And last for now, before this becomes a monster post with a life of it’s own, this was a mani I wore for my very first protest, against the testing of legal highs on animals. GRRRRR.

Cannot believe we have to protest this, because the government wants to make animal testing of dangerous PARTY drugs mandatory. Words can’t express how angry I am about that!

Anyway, this was a base of Model’s Own – in Little Lemon, two coats over Kleancolor White. I’d show swatches on it’s own, but the white base was so streaky that it was really ugly 😀 Whoops!

And I stamped puppies, cats and paw prints over it, using China Glaze Liquid Leather, and top coat, which smeared the stamping polish, whoops. I did colour correct these photos to show how neon yellow this polish is, so ignore the greenish fingers :D. This is an amazing neon polish! 😀

Have a wonderful day
Ami
More BlogFest 2013 designs..
I thought I’d do more than one type of nail art, so here are the other two concepts I had! 🙂
My second nail art was an attempt at dry marbling, I had one coat of Camo, then random blobs of Camo, Antique, and Razzle Dazzle, which I moved around on my nail using a dotting tool.

It wasn’t as successful as I hoped, but I did like the effect! Subtle, but interesting.

And my third and final mani using all three polishes:

Two coats of Antique, then a thick coat of Camo over the top, leaving Antique at the bottom, ruffian mani style. I added random irregular blobs of Antique to my ring finger, then went around it with black nail art pen to create a funky coloured leopard print, and then added a small glitter tip with Razzle Dazzle.

Top coat to finish, and done!

And my favourite – yes, would be the first one I tried.
Thanks again to piCture pOlish, hours of fun! 😀
Have a great evening
Ami
piCture pOlish BLOG FEST 2013
Hooray! 😀 I was lucky to be chosen to participate in piCture pOlishes 2013 Blog Fest! This year, it was all about the nail art. A bunch of bloggers were sent three piCture pOlish polishes, and asked to make some nail art utilising all three polishes, and post it at 7pm local time on July 29th, including a tutorial for said mani. These were the polishes I was sent:

Camo (faded green creme), Antique (mid purple sparkly foil) and Razzle Dazzle (purple, blue and gold glitter in a clear base). Pretty polishes, but a bit of a challenge to use together. And I’ve never done a tutorial before – well, sort of one on catching chickens, but that’s a different story :D.
Here we go!

This is a skittles type mani, where every nail is different to the others. And here’s how I did it 🙂
First, prepare your equipment:

Next, paint the base colour according to your plan. And yeah, for the very first time, I planned this. As in, I made a diagram and everything. Here I have two coats of Antique, and two coats of Camo on alternating fingers.

Now realise that you’ve forgotten some important pieces of equipment, like tape, and go get it. In the meantime, add a coat of Razzle Dazzle over Antique on little fingernail, and top coat the other nails (to speed up the dry time).

Add another coat of Razzle Dazzle over little fingernail, and then notice you’ve put a dent in the polish on your index finger: change the plan slightly, and stamp the tips with a dot pattern, using Antique. Make a mess, and take off some of the base colour when attempting to clean it up. Stop trying to clean it up, add another light coat of Camo to cover, swear a little inside your head. Use dotting tool and Antique to fill in the paler dots.

Now that the middle nails are dry, use tape, and work blind – hoping it’s moderately even. Paint the opposite colour (so, Antique over Camo, Camo over Antique), remove tape.

Ta Da!

Add heart shaped nail pieces to the taped nails, Razzle Dazzle to the index nail.

Add top coat to all nails, using matte top coat on the index nail.

Clean up if needed, moisturise, pose hands furiously.


Thank you, Jules and the team, for letting me be part of BLOG FEST again this year, so much fun. 🙂
You can buy piCture pOlishes from their website, shipping details are here, network details are here, and they have some fantastic Everyday Deals here.
If you’d like to stalk them (which I highly recommend!), you can find piCture pOlish on Facebook, Twitter, Pinterest, and Instagram.
Have a brilliant day
Ami
Color Club Endless Summer – Swatches, Review and Layering
While on a recent mini spending spree on Head2Toe Beauty, I saw this little bottle of blue polish, and then couldn’t find any swatches for it, and bought it blind.

This is Color Club Endless Summer, and I’m glad I took the chance, it’s a lovely mid blue, has a slightly teal tone to it, and more murky than clear. It’s very very pretty.

It’s actually really hard to get a good accurate colour pic of this, my photos seem to be pulling a bit more true-blue than it actually looks, although the tone does seem to change based on the lighting. So please, imagine a tiny bit more teal to this! Another interesting aspect was that it dries to a strange finish, not matte, not shiny – waxy? Satin? Pretty, anyway!

These photos show two top coats, the formula was quite thick and a bit hard to work with, but nothing major – and it self levelled and covered beautifully in the two coats. I thought the dry time would be really slow based on the thickness, but it was actually really quite fast indeed, only a small fraction slower than the one I put fast dry top coat on.

I wanted an accent nail, and as it was so summery a colour I added piCture pOlish Splash, which worked really well! One coat of Splash topped with China Glaze Fast Forward.

The Dry Fast Test had been passed, but I now worried about wear and tear – after all, top coat makes polish last longer, right? And it’s a rare polish that will last out 24 hours on my nails without showing major tip wear and/or chipping. So, I top coated my index finger as well, and left the others untouched as the control group.

It was really interesting, because the top coat made it shiny, obviously, but also changed the colour a bit, made it noticeable lighter. I tried to get a photo of the little finger of my right hand which I had put top coat on the tip only, to show that a bit clearer.

And the wear test? This is after about 30 hours – very little wear, and it’s equal with and without top coat. It did get some strange little lumps and bumps, probably before it dried properly 🙂

So there you go! Endless Summer 🙂 Though right now we could all use a serious case of Rainy Autumn, we are in the middle of one of the worst droughts I’ve ever experienced at the moment. I’m going to go track down a polish called Rain Dance… Wish me luck!
Have a great day
Ami
piCture pOlish Demeter: Goddess of Chocolate – swatches and layering.
What’s that? Demeter wasn’t the Goddess of Chocolate, you say? Check out this polish!

Chocolate, right? With shimmer? Yeah, I thought so too. 😀

These photos show two coats of Demeter, in the early morning sunlight, no top coat.

I did find that the brush was a bit floppy, but the formula here (and so far on all piCture pOlish polishes that I have tried!) is so good that it didn’t matter.

Look at that gorgeous holographic shimmer. I do like the irregular shape and size of the shimmer, it gives a fine scattered holographic effect in part, and also the appearance of a fine glitter, but it is completely smooth to touch.

The most difficult thing about this polish was reducing the numbers of photos I took down to a manageable amount to post here!

Then, going with the glitter theme, I added one easy coat of Hits Golden Disco (6ml), topped with a (thinned down!) coat of China Glaze Fast Forward.

Blingy!

I like this combination, the more subtle shimmer of Demeter is still peeking through quite noticeably, the fine glitter in Golden Disco increases the effect, and the holographic mid sized gold and silver glitter hexes give a bit more sparkle.

It also helps extend the wear time of the base polish; my nails are moderately bendy – which means polish tends to fire off at the tips, and a glitter coat is often thick enough to prevent that from happening for longer.

I like this combo! I love brown polish, especially rich chocolate browns, so Demeter is a show-stopper for me; the addition of holographic shimmers and glitters only enhance the appeal. I also think some copper, gold, or bronze toned glitter polishes would look lovely teamed with Demeter.

You can buy piCture pOlish lacquers from their website here, or check for distributors closer to home. I bought the Hits polish from Llarowe, and Demeter from Gracie Lou here in New Zealand.
Have a sparkly day
Ami 🙂
piCture pOlish Kryptonite: aka G’day, Gorgeous Green Polish!
And by gorgeous, I mean STUNNINGLY, jawdroppingly, eye-bulgingly good looking.

This is piCture pOlish Kryptonite – a collaboration shade, and whew, what a collaboration! I have three coats on for these photos, topped with China Glaze Fast Forward. It looked opaque in two coats, but the third really gave it depth.

Here’s a strange story: when I got a bit of money in, I had my eye on Demeter and Kryptonite from the collaboration series, and so went out, from a couple of different e-tailers, and bought them. BUT… I bought two lots of Kryptonite. Moral: it pays to keep note of what you are buying if you go frothingly mad buying polish. Second moral: if you’re going to buy two of the same polish, make it as beautiful as this one!

It is such a rich emerald green in the shade…

..and in the sun it has those stunning holographic flakes.

Dry time was pretty average on this one, not fast, but not too slow either.

I couldn’t take my eyes off this. It had a pretty short life on my nails though, chipping moderately quickly. That’s not abnormal for me, though, but I think next time I’ll layer it over something else, and see if that extends the wear.

Then, to disguise those chips in a hurry (the next day), I added a franken glitter top coat:

This was a glitter mix, I added the white hearts to the mix, the rest was already there, I just added it to the suspension base and it’s all holding up quite well. One coat, I don’t believe in stinting on glitter 😀

This was so Christmas-y I think, pity I didn’t have it then! And I loved the way the gorgeous green and holo of Kryptonite was still very visible. And the half-hearts. Hehe half-hearted nails.

Have a great day!
Ami 🙂
Ozotic Sugar 903: Swatches, Layering and Review
The final of the four piCture pOlish and Ozotic polishes sent for review, this is the spookily pretty Sugar 903.

Why spookily? Well, I just found that this polish, opaque in three coats (shown in these photos with three coats and no top coat) was such a glowing, multi-hued colour that it looked almost glow-in-the-dark – sort of an almost eerie luminescence. It doesn’t glow in the dark, but it really looks like it should. I love the lilac and the light blue sparks in this gorgeous glass fleck polish!

Formula on this was beautiful, slightly more on the runny side than the thick, but it goes where you put it and there is no pulling, or bald spots, even with only a short time left in between coats. Dry time is slightly on the long side, I’d definitely recommend using a quick dry top coat.

Like all piCture pOlish and Ozotics, these have the QR code on the side, scan it and get taken to their website 🙂
And then I layered it, to see what that would look like. I was going to choose Revlon Royal to layer it over, and I will still do that at some stage, but my hand went and chose Kleancolor Cobalt all of it’s own accord.

Two coat of Cobalt, one of Sugar 903, no top coat.

Wow, good choice, hand. I loved this. It was insanely shimmery, in the shade or sun, and just.. just.. ugh. Well, you can see 😀

And whooo boy does it shine and shimmer in the sun, and the duochrome in Sugar 903 is so obvious!

One thing about Sugar 903, like Beam 907, is that removal from your nails is easy. Very easy. Removal from your skin… quite tricky. Oh, there’s no staining or anything drastic, but those teeny gorgeous shimmery glass flecks love to stay on your skin for awhile afterwards. It’s not just Edward who sparkles in the sun, is what I’m saying here. You can probably see it in these photos 😀

Then I thought: Challenge! I want to use ALL FOUR in one manicure. Which four? These! piCture pOlish Splash, Ozotic Sugar 903, Ozotic Beam 907 and Ozotic Scatter 912.

And… I’m quite happy with the outcome, though I can see room for improvement.

I had two coats of Ozotic Scatter 912 to start with, then taped off sections (by forming an off-centered X with the striping tape). On the bottom left side I put Ozotic Sugar 903 (blue), and the top left I put Ozotic Beam 907 (white). Over all of this – after removing the tape – I put Splash.

Then I thought hmmm, I don’t like how thinly I’ve put Sugar 903 on, so I freehanded another little layer over that triangle, in effect making a shimmer sandwich with Splash between the two layers. The whole lot was topped off with Misa BREAKneck.

Considering I used four quite different polishes, this mani was quite subtle. I think that’s due to the softness of Sugar 903 and Beam 907, and the tie in effect of Splash. I really liked it!

What do you think? piCture pOlish and Ozotic are sold through their website here, and also through Gracie Lou here in New Zealand.

Thank you, Jules, for letting me have the chance to play with these gorgeous polishes, I hope my photos have done them justice.
Have a great day
Ami
*Disclosure: the Ozotic polish shown here, Sugar 903, was provided to me for review. All other polishes, bad cleanups, poor photography, overly wordy descriptions, opinions and random hand poses are entirely my own.*

