Blog Archives
Pumpkin Glow In The Dark Nail Polish
My good friend Megan from Two Lacquered Girls recently had a polish destash, and sent a bunch of gorgeous polishes to me. Squueeee! I had a worry that something would happen to it en route, but it was delivered fine, and what an amazing box of goodies it was! All these polishes, plus some amazingly pretty Kiss nail stickers, glitter, and a few lollies too (which didn’t last long, NOM!)

And look, little fluffy chicks! Does she know me, or what?! 😀
Now, I have a strange thing with polishes. I don’t like just plain swatching them, (i.e. paint my nails, take a photo, remove polish). I feel I have to wear them all, properly, get to know them. Buy them flowers. Something. So it takes me quite some time to get through my new polishes, and it’s always fun seeing which one I will try first. And the one that won that dubious honour was this hilarious polish!

It looks like a pumpkin! It’s NEON orange! It glows in the dark! This photo shows three coats on it’s own, plus a glitter top coat franken of mine to tone down some of the neon. I don’t have many neons, but I adored this. So much so that, not two days later, I put it on again (yeah, sorry, other polishes. Your turns will come).

So, more elaborate! I had Kleancolor White as a base (more NEON!), two coats of the Orange Pumpkin, and Cover Band Sticks ‘n’ Stones. I striped off the accent nail, and that made me want licorice allsorts all day! The other nail has a little nail sticker on it, which looked great until the top coat (Misa BREAKneck) made it curl up. Ah well.

And look, in the dark! Ok, hiding in the kids closet. It was dark enough.

Thank you so much, Megan, for all the pretties! I love them 🙂
Have a wonderful day
Ami
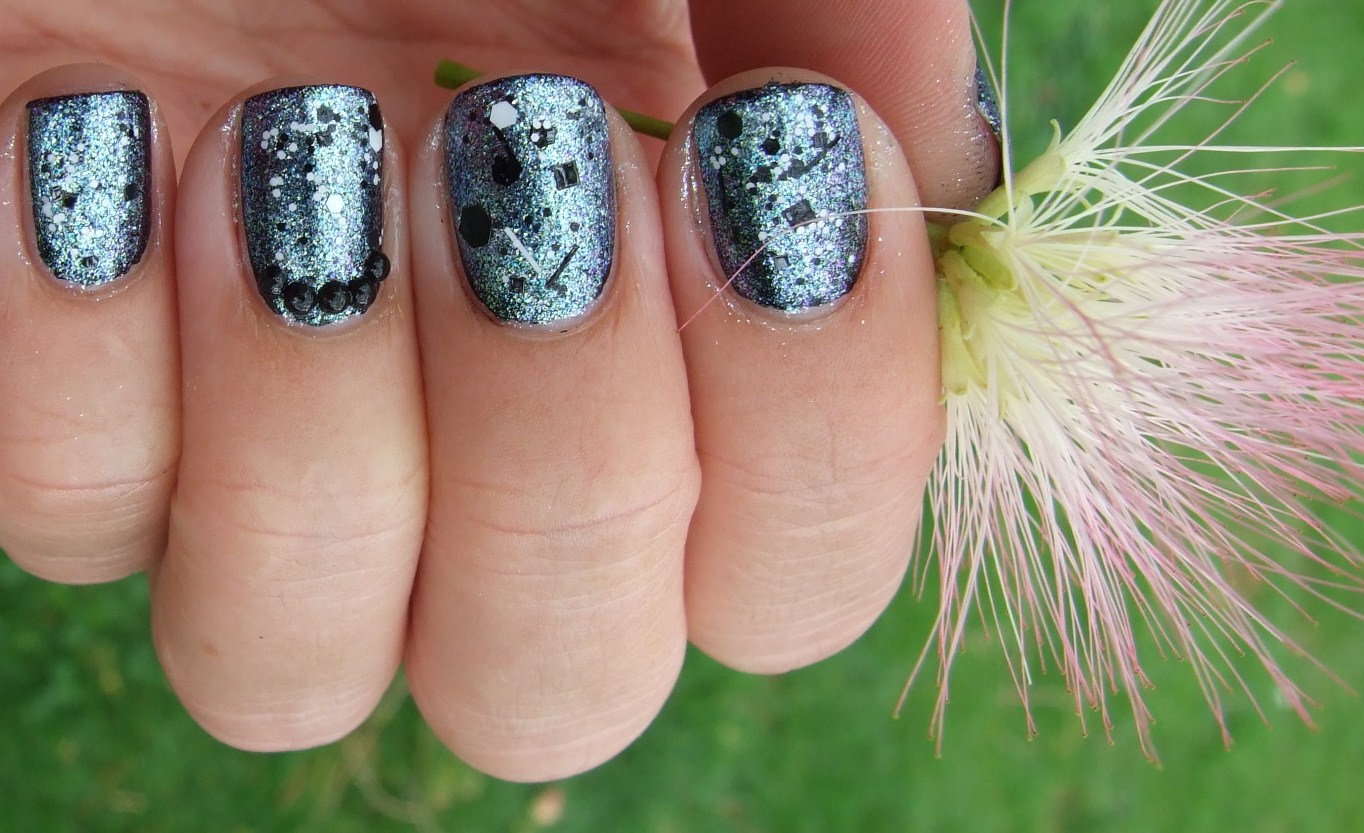
Party Nails: Layla Holographic Retro Pink and Cover Bands Stick ‘n’ Stones
My friends and neighbours had a 30th birthday party, dress up or down optional. Of course, I dressed up. I do this. And I chose 80’s theme, as I also like too. And then, of course, had to make my nails themed too… So I chose Layla Holographic Retro Pink (2 coats), Cover Bands Stick ‘n’ Stones (2 dabbed coats), Vivid Lacquer Your Princess is in Another Castle (1 coat) and finished with China Glaze Fast Forward.

One huge advantage to the Layla Holographics is that they dry so fast! Another is that they are very pretty, and VERY holographic.

Sticks ‘n’ Stones added that sort of graphic look that reminds me of the 80’s era, and just broke it up a bit for me, and I loved that the thin layer of Your Princess is in Another Castle added some chunky holo and pink glitters to make it all perfect.

And then I took lots of photos in the sunlight…

And another!

And in case anyone wanted to see a bad photo of my outfit, here it is 😀 You can’t really see, but my makeup was all blue and pink (loads of pink), and my earrings were huge. I also wrapped necklaces around one boot hehehe.

Have a wonderful day
Ami 🙂
Ozotic Beam 907: Swatches, Layering and Review.
Third of the four stunning polishes sent to me for review, this is Ozotic Beam 907, a pretty, sparkly, mother-of-pearl looking polish.

This shows three coats, no top coat. In these photos it looks a bit sheer, but the camera must have x-ray vision because I couldn’t see any sheerness in real life, it was too blingy for that!

Beam 907 has a very strong green flash to it, a lovely iridescence, but it isn’t greenish toned at all – it’s more a true definition of white ‘all the visible colours of the spectrum’ have been put in this – there is a rainbow, but it’s a iridescent rainbow, not a holographic one. Super pretty and clean, and it doesn’t look harsh at all!

And then, naturally, I thought about how it would compare to piCture pOlish White Wedding, which I bought some time ago.

Well, as you can see, White Wedding – on my ring finger) is much, er, whiter. It also starts off much softer, and the density builds up very differently. This is three coats of both (White Wedding and Beam 907), no top coat.
There is a ‘rainbow’ particle in White Wedding which is just gorgeous – it’s sort of a soft creme jelly hybrid with miniscule iridescent particles. Beam 907, in comparison, looks like it is completely made of those same iridescent particles, which are quite a lot larger.

Both are gorgeous, both are completely different. Both take awhile to dry without topcoat, too, beware of that. And of the two, I much prefer the brush in the Ozotic bottle to the White Wedding brush – the Ozotic brush is just a bit shorter and easier to use.

O.k, that’s a comparison! Now… how about layering Beam 907 over white? You know, to conserve the polish and everything – does that look different?

Uh, yeah. Very different. This is one coat of Kleancolor White, and one coat of Beam 907, no top coat. This is a harsher look, much ‘whiter’ and not as diffuse, but again that soft green flash and the multi-coloured iridescence softened it enough that it was still very wearable. One thing to note about Beam 907 – removal, while easy, tends to cover the fingers up to the knuckle with silver shimmer. Which takes FOREVER to get off. Just saying 🙂

And finally, I do know from stalking other blogs and swatches that the Beam and Sugar series are designed to be able to be layered, and I knew I wanted to do it over black. This is one coat of Beam 907 over Kleancolor Black – one coat of each.

And then I added one coat of Cover Band Sticks & Stones:

And I placed some black rhinestones at the base of my ring finger, and topped the whole lot off with Misa BREAKneck top coat.

This looked so much BETTER than I thought it would, the main colours that showed were green and blue, and some purple too.
It all dried about average speed with the fast dry top coat, and then wore quite well too!

You can buy Ozotic and piCture pOlish polishes from piCture pOlish website here, and Gracie Lou here in New Zealand. You can still scan the QR code on the side of the bottles to be taken to their websites, too.
Thanks for reading! Have a wonderful day
Ami 🙂
*Disclosure: the Ozotic polish shown here, Beam 907, was provided to me for review. All other polishes, bad cleanups, poor photography, overly wordy descriptions, opinions and random hand poses are entirely my own.*
November 8: NO HATE
“Bullying is not funny. It is not cool. It is not right. And more importantly, it is not okay.
Most of us are, thankfully, residents of countries that support tolerance and many of our families have settled in these places simply for that reason. Generations later, it is our responsibility to perpetuate that message of tolerance across our new social platforms, including the internet.
As members of the nail polish blogging community, we all share a love of beauty, color, and lacquer. Other than that, we are remarkably different: from our race to our religion to our hair color…even to our polish application techniques. To marginalize anyone because of those differences is completely unacceptable and today I take a stand against that. I refuse to allow other people’s view of “normal” dictate how I behave, believe, and blog.
In solidarity with a multitude of bloggers linked below, my purple manicure represents my proud commitment to the No H8 movement. Today, November 8, I dedicate my post to ending bullying of any kind and to encouraging diversity and imperfection among our colorful community.”

What a great idea/cause/stand to take. I believe the quote above was origingally started by Nails By Ms Lizard (AMAZING blog, check it out! http://nailsbymslizard.blogspot.co.nz/). The thing is, there’s a wee bit of drama that happens in the nail polish world – and it’s not cool. Neither is the bullying and meaness anywhere. There’s no real need for being mean, we can all adult up, be polite, hold our own boundaries firm without picking fights or being nasty. Right? Sometimes? It’s a goal, anyway. SO, I’d like to support this – I’m in this for the solidarity, the community, and the pretty colours, glitters, and textures.

Here’s my ‘from the already posted’ photo list: my Purple for No Hate (I can’t do the letter/number thing too much, makes me think I’m back in algebra class, shudder) – with accents of pearls, tape, and Sticks ‘n’ Stones. Appropriate, huh. I thought so 😉
Have a great day!
Ami 🙂
Misa Grey Matters with Red, White and Black top coat effects
There are a few indie polishes around that are similar in concept to my beloved Sticks and Stones, but red, black, and white instead of just black and white. They’re power colours, to me, and I love them. Sticks and Stones is, of course, gorgeous over red whereas one containing red glitter would be harder to match, but I want one, someday.
So there I am, in the $2 shop, when I hear this 4ME polish whispering my name.
It has tiny red and silver glitter particles in a clear base.. and the possibility of using this with Sticks and Stones grabbed me almost as fast as I grabbed the bottle.

My immediate thought for a base colour was grey, so I went for Misa Grey Matters – lovely soft grey with subtle silver shimmer and black speckles – earlier swatches here. These photos were two coats.

Nice, I think! Then to add a thin coat of Cover Band’s Sticks and Stones, and Orly Sec ‘n’ Dry topcoat.

Pity the glitter in the 4ME polish was so much smaller, but I still liked this combo! It was quite different, as Sticks and Stones are matte glitters, and 4ME is shiny, but it still worked. For now, this eases the lemming, and gives me more to play with.
Another angle – this one shows that silver shimmer in the Misa base.

And a whole hand photo – you can see that from arms length the black and white is far more obvious, and is a nice effect on its own anyway. Win / win!

Have a great day
Essie Sew Psyched – Swatches
This is Essie Sew Psyched, and my first experience with Essie. I bought this one at a big cosmetics sale for $8 – normally I wouldn’t buy Essie polishes because they are owned by L’Oreal who test on animals, but: a) the parent/child company and animal testing area is a bit of a grey one – PETA encourages us to spend money at the non-testing child company to prove a point to the parent company that testing is unecessary. See, I think that’s a touch naive, but… then there’s: b) it was a really pretty colour. (shame.)

Sew Psyched has a really pretty silver microshimmer to it – which I can’t see AT ALL on my nail, but I think it does add a bit of depth to the colour.
These swatches are two coats, no top coat. This polish had a thinner formula than I was expecting, with the odd rampaging blob of polish – watch out for those. It self leveled well, and was nice and opaque in two coats. Good wear time, minimal tip wear the next day. I’d describe the colour as a lovely blue based khaki green, and it was fairly flattering on me.

Sorry about the cuticles! Big day of swatching 🙂
Whole hand photo… it’s not a weak colour, but it is quite subtle.

Then for fun I used top coats of Darling Diva Polish – Dreamy, Australis – Speck-tacular, and Cover Band – Sticks and Stones over the Sew Psyched (little finger Speck-tacular, ring finger Sticks and Stones, middle and index fingers Dreamy). I really preferred Dreamy as the finish. The holographic top coats’ silver tone turned it into a very grey sage green, and Sew Psyched really amped up the holographic sparkle of Dreamy. ( I like it so much so that I’m wearing it as a pedicure…) Sticks and Stone looked nice, and would be great for a camoflage effect, and Speck-tacular just didn’t really impress me over this colour.

Shade photo

Shade – the flakies look so nice in the shade
Whole hand photo with the top coats.

Look how nice that holographic looks in the sunlight! And how invisible the flakies are… 🙂
After this first experience I’m pretty happy with Essie – it did dry fast, and removal was easy – it didn’t stain either. Unless its at a mega sale I won’t be racing out to buy more (apart from Smooth Sailing, maybe. I WANT that polish.)
I don’t think the big cheese parent companies give two figs about where they get their money from, as long as they get it. The concept of buying from the non testing child company would only work if we didn’t buy anything at all from the main company, and if they stopped selling in China (or China changed that animal testing pre-requisite). I don’t know if that’s going to happen. But I do love this polish, yessir.
Depend Nail Polish 210 – Swatch
This is the first yellow I have ever bought. I have an Anna Sui yellow – but that was a gift. And I don’t use it, as it takes 4 years to dry. Smells pretty, though.
Let me bore you with a gratuitous explanation: my mother is Hungarian. I have inherited, from her, a very olive based skin tone. Olive to the point my (then) 2 year old neice who was learning her colours would point to all our hands going ‘pink’ (my sister), ‘pink’ (my other sister) ‘yellow’ (me). So.. yellow polish = scary beyond all reason.
And unfair, look at this little bottle of pretty silver microshimmery sunshine. (click any photo to enlarge if you so desire!)
")
And you can see the silver microshimmer.. pretty.
And then look at it on me..

These swatches are three coats, no top coat or base coat (am lazy today). This polish applied like butter *snigger* ok, I am just saying that because it’s butter coloured, this polish was a streaky streaky streak, but mostly levelled out at three coats. I have read that most yellows are streaky, so it’s a pigment issue, not a brand issue. Other than the streaks, it was really easy to apply, and didn’t run anywhere.
Whole hand photo… see? YELLOW! BAD! *yellow alert, yellow alert*

‘Tis the Return of the Olive Lobster…
I’m keeping it on, though. I am stubborn, and I want to not be scared of this colour.
I have, however, put some top coat on it…

All nails have Cover Band Sticks and Stones, except the ring fingernails which are Color Club Wish Upon A Rock Star – with a clear car paint top coat (love that stuff, wish you could all try some!)
It hasn’t helped, much. Now I feel like I have exploded emoticons on my hands. My nails are the Secret Emoticon Burial Ground (well, it’s not secret now, we all know. oooops).

Next time I use this polish I am putting happy faces on.
I’m still glad I have this polish, and still in love with the Depend formula. Fast drying, easy applying, easy removal … I do want a bigger range from them, though. Postie Plus just doesn’t have that much… anyone else know where I can get them from? Its a great way to try new, scary, colours. 🙂
Depend Nail Polish 009 – Swatch
My friendly fellow NZ blogger and HUGE nail polish addict Delindel from Domestic Minxes recently told me about her Depend purchase of this very nail polish (009). She hearted it, apparently. Well, that was good enough for me: along I trotted and picked up 009 (the resentful and about to turn nasty agent brother/friend of James Bond, I guess.)
*Actually, wasn’t the baddie played by Sean Bean 009?? I only remember that movie because Sean Bean = hot *
Back to the polish, and here it is!

I’d describe it as a deep peach with fine silver shimmer. This was the exact polish I was looking for when I was 14. I saw a lady wearing this colour (wouldn’t have been this brand way back then!) and I longed for nails like that. Subtle, yet glam. I nagged my parents, and eventually they let me buy the closest I could find… which was orange. I’ve been scared of orange since, though I am taking steps to get over that. I would have been wrapt to find this colour at 14.
But… add 20 years to that age, 20 years of hard-ish work and sun exposure.. and this polish is no longer my friend. It gives me instanto old lady hands.

I do like the colour, I just don’t like it on me. Sorry, Del! However, I am glad I got it, as now I have that colour in my stash and can cross it off the list. These pics are three coats, no top coat. It was very sheer, still some VNL at three coats, nice and shiny, and had a great – though thinnish – formula. No running or streaking.
I did decide to go top coat crazy,and see what that would do.

Pinky is L.A.Girl Glitter Addict in Flamboyant, ring fingernail is Cover Band Sticks and Stones (suprised? Didn’t think so!)

Middle finger is Color Club Wish Upon a Rock Star, and index fingernail is Darling Diva Polish Dreamy.

Out of all of these, I liked Dreamy the best. It made it even more subtle; softened up the peach colour, and added a nice holographic effect. So, for a super safe ‘play-it-by-the-80’s-book’ with an almost invisible twist, I’d pick that one. 🙂
Color Cosmetic 19 – Swatch and Nail Art
CR nail polish (from the Dollar Shop for $2 each) is a weird little brand. You can never guess what colours will be there, and what it will actually look like on the nail. More fun, says me. Lately there has been a run of shimmery metallic almost foil finishes, and number 19 here is no different.
It’s an apple green with a gold oversheen (they call this oversheen ‘flip’ in car paint. I think I’ll call it that, it has less letters than ‘oversheen’ hehe). It’s not a duochrome, you see both colours at all times. It’s a very spring-esque colour, I think. I also don’t follow trends – by choice as well as by budgetary necessity – so I’ll wear seasonal colours whenever I want 😀 These swatches are two coats over Revlon Color Stay base coat – and they dried fast, with only a few bubble on my pinky nail. No top coat here.

Please ignore the splitting nails! I dealt to them shortly after taking this photo – didn’t notice until the macro. Argh! 😀
I liked this colour on my far more than I thought I would! Something very fresh about it, and it didn’t give me lobster hands at all.
And… in a nice coincidence, the dotting tools I ordered off Ebay turned up! I blame Sugarmitten – she does magic with dots, and I think I’m hooked. I thought I’d try this with a variety of top coat effects, and see which I liked best.

So.. pinky nail had the Rokk96 Emerald shimmer – this was very subtle but had a nice effect (one coat). Then ring finger had rows of dots with Dreamy – the holographic top coat from Darling Diva Polish – this was also very subtle, but I really liked it too.

Then middle finger was Sticks and Stones by Cover Band (from Ninja Polish) – love love LOVE this – esp as the black bar glitter formed a twig pattern! There’s no way I could make it do that, but cute! Then I used ye olde dotting tool again to make flowers on my pointer nail – two goodish flowers and one Chernobyl Rose hehe. I think I liked this one best of all, talk about Spring-y! Its a nice day today, but we’re certainly falling into winter at great speed: this nail art makes me smile. The petals were China Glaze Make Some Noise, and the centres were Anna Sui 803. Ironic using a rose scented polish to make flowers with…

What are your favourites? I enjoyed this nail polish (and mucking around with the nail art) quite a lot. More than $2 worth, probably!
Butter London Teddy Girl and Top Coats O’Fun :)
I really like this pink polish – but as I mentioned in the previous post, it did give me lobster fingers. One trick I have for that is adding top coats (or nail art) to break up the starkness of a colour and add visual interest: either the colours soften and make my skin not look as red, or the distraction works 😀
Over the three coats of Butter LondonTeddy Girl and L’Oreal Quick Dry top coat, I put one coat of Cover Band Sticks and Stones – with an accent nail of Darling Diva Polish – Dreamy over Teddy Girl. This photo is taken inside: the light shows off the holographic effect, but is redder than it looks in real life. (click on any of these photos to see them BIGGGER hehe)

I like this! Sticks and Stones (the black and white glitter) looks great over everything I’ve worn it over so far, and this is no exception. It looks really 60’s mod-like to me. Pink, Black and White – I just need knee high white boots and a swing mini dress to match the polish. And white eyeshadow, black liner, and this exact pink lipstick. I’d look a complete weirdo; it wouldn’t suit me AT ALL, but it would soooo match that polish 😀

However, I love love love LOVE the Dreamy holographic top coat over this. The silver sheen softens the pink and looks amazing in the sunlight. I have taken a lot of photos here to try and capture the holographic effect – which is quite subtle over the pink, but very linear and pretty. This is so delicate and nice looking, and doesn’t make my accent fingers look red (whereas there is still some lobstering on the other fingers).

More photos!

The whole hand photo (and pink dolphin ring, hehe)

And an extreme close up of the Dreamy polish over Teddy Girl:

Thanks again, Megan, for sending Teddy Girl, I’m having a lot of fun with this polish!

