Blog Archives
Too Many Untrieds 6: OPI and OPI Designer Series
My little stash of OPI untrieds have grown to a stage where I think they have earned their own post 🙂
The Color To Watch- 3 coats no top coat, ring finger has one coat over Kleancolor Black

Some colours just scream out to be layered, and I’ve started listening. Pretty dusty grey purple with blue shimmer, yes, but over black it’s stunning. Sorry about the mess, my chicken was sleeping on me and when I went to get up and take the photo, he flapped his wing and took out a goodly portion of the polish. My patch job was inadequate.

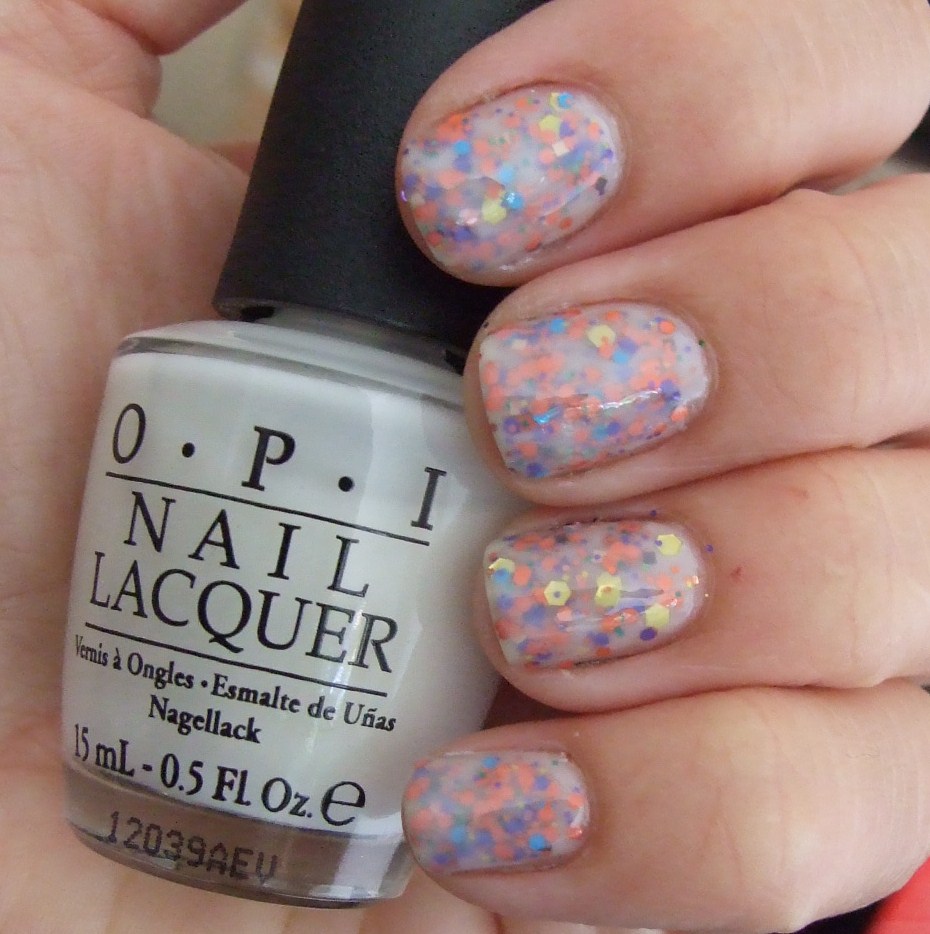
My Pointe Exactly – jelly, very sheer. 3 coats

Very sheer, as you can see. If your nails are in better condition than mine this would be a nice soft neutral look, glossy and squishy. But why do I like it? Well..

it makes a perfect jelly sandwich polish 😀 This is one coat over Crown Me Already 🙂

OPI Crown Me Already – 1 coat over My Pointe Exactly

This is a destashed polish, and it’s so thick it’s almost unworkable (even after about 15 drops of thinner) but I’ll add more, it’s super sparkly and would easily be opaque in two coats. Nice!

Peace, Love & OPI – 2 coats, very close to being a one coater!

Predominantly shifts between grey, green and purple. It is quite chrome, so brushstrokes can show, though they mostly dry out. My recommendation is to finish each nail with a brushstroke down the very centre of each nail, even up the lines 😀

Muir Muir on the Wall – 2 coats

This looked like a darker version of Peace, Love & OPI in the bottle, but on the nail they are completely different. Not as colour shifting, but a more flattering colour base, this looks to me to shift between a maroon red and gold, catching a glimpse of green around the edges. Me likey!

An Affair in Red Square – 1 coat. Not sure if this would be a one coater normally, it’s an older polish and has thickened a lot. Took a whole eyedropper of thinner to become workable.

Pretty, deep shimmery red.

Blue My Mind – 2 coats

I was expecting this to be a pretty wishy washy colour for some reason, and it’s not. It’s gorgeous. That purple duochrome just sneaks around the edges, though I couldn’t capture it here.

Divine Swine – 3 coats, one coat over Kleancolor White on ring finger.

I think I’ll choose another layering option next time, but the sparkles are pretty.

Pink Yet Lavender – 1 coat over Kleancolor Black, three coats along on ring finger

Can’t see any lavender 😀 Love this though, so girly and sparkly, but I like it over black best 😀

OPI DESIGNER SERIES POLISHES
Temptation – 2 coats, no top coat

You could leave this with no top coat for a textured look, or top coat it for maximum bling. There’s a lot of glitter here though, I’d recommend a couple of top coats if you want smooth. I like the little turquoise glitters in the red toned purple.
Extravagance – 2 coats. Very close to being a one coater.

Love this one, too! A plum coloured polish I can wear! Yay! 😀

Magic – 3 coats.

I want to layer this over black! The duochrome (blue to purple) does show, but I want to see how much it pops over black sometime.

What a pretty polish!
DS Classic

Two coats. oooooh. ahhhhhh. LOVE!

And… the sunlight just disappeared. Maybe they weren’t joking about those thundery rainstorms on the weather forecast. Regardless, I can’t show you (or see!) the holographic shimmer, but looking at the particles here, even in dim light, I think it will be awesome. Dries fast!
DS Reflections – two coats, almost a one coater

Perfect summer colour! Pink, slight coral hue, nice thick holographic shimmer flakes

And that’s all for now!
Have a great day
Ami
Zoya Fall Pixie Dust Skittle Swatches & Comparison
Good morning!
Racing through my untrieds now, this was/is my first ever outright purchase of a whole collection of polishes, the Fall (Autumn for us kiwis) Zoya Pixie Dust collection. (off Ebay, yay!). And I really wanted to wear as many of them as I could, as fast as I could, so here they are!
Rainbowish, the gold is Tomoko, orange is Dhara, Green is Chita, Blue is Sunshine, and the purple (thumb) is Carter.
No top coat, they’re textures, and I find the Pixies more gritty than the OPI liquid sands, but far more glittery and pretty 😀

Two coats of all except Carter (purple), which is a 3 coater. Chita and Sunshine are one coaters, really, and so pretty.

LOVE!!

It’s also really easy to stamp over these textured polishes, which is fun 🙂

The one over the orange is a tiger, it’s really nice but the orange is so sparkly that you can’t see it in these photos. Sorry!

And a quick comparison between Zoya Tomoko and OPI Honey Ryder… in the bottle Honey Ryder looks much warmer toned

On the nail they look very similar. I hoped Tomoko would be more platinum toned, but no, very similar. Tomoko is much more glittery, like finely ground crystals, whereas the finish on Honey Ryder is more wrinkled and smooth, foil-like, or small gold brains 😀 😀 Tomoko has a better name. 😉 I’m glad I have both, they are both gorgeous!

And last in the set is Arabella, a lovely deep fuchsia type pink textured polish.

I have one coat of Star Kin Orbit over Arabella on my accent nail, and two coats of Arabella. No base, no top coat.

OH! I almost forgot to say, the blue and green and purple textures here didn’t stain my nails at all. I know the earlier lighter blue Pixie Dust was VERY stainy (and very pretty), so thought I’d mention. These are fine 😀
Have an awesome day!
Ami
Nail Mail and Some Swatches and Suchlike :)
Haul from Beyond Beauty… love the textured polishes!

OPI What Wizardry is This, Honey Ryder, and Alcatraz … Rocks.

And this went on straight away!

Accent nail is Honey Ryder, the rest are What Wizardry is This. Three coats, no top coat (obviously).

These do dry quicker than normal nail polish, but still takes time without the fast dry top coat, so I did ding this. Of course 😀 That’s why the bling.. it’s hiding a ding (there’s a poem in there hehehe)

Then I stamped it, which was fun, and showed up quite well! Stamping polish used was my good old trust A-England Excalibur (old version, I have a beady eye on the new version…)

And some shopping plus mail – the Sorbet is a face cleansing bar that really works and softens, and is also good as a shaving aid, not as slippery as many, but a lovely pay-off in terms of smooth skin afterwards 😀

I feel so lucky, I don’t often get the chance to get more polish (which, harkening back to my issues with an abundance of untried is probably a good thing), but I love getting polish in the mail! Look at the gorgeous piCture pOlish (an Ozotic, yay, 505 is MINE!) polishes 😀

Here are two I got from Steph from our polish group, OPI My Pointe Exactly (been wanting this one for ages!) and Color Club Flair, which is a very pretty deep shimmery orange, yay!

And the Zoya Fall Pixie Dust collection! my first collection! And yay, so happy, been wanting the pixie dusts’ for ages, and these look amazing.

and a whole bunch from Cherry Culture’s website, yay, holographic glitters! Shipping was very quick, I think within the week, I am super impressed! Packaging was exceptionally good, too. Yay! I also got a couple of lipsticks, not included in the photo, and they are nice.

and yay, Elevation polishes! Including a very nice unscented cuticle oil, and a ‘scratch and dent’ Marmaloda, which looks pretty darn nice to me!

I also have some of the MoYou nail plates (amazing!) and the Pueen Sumptuous stamping set, but I’ve lost my photos, and energy level to retake them is in the minus figures. Sorry! 😀
Have a great day!
OPI: Goldeneye – Swatches and Layering
One of the polishes I bought with my birthday voucher from Candy Girl, this is OPI Goldeneye – from, obviously, the James Bond collection.

Pond. Fish Pond. *cough*

This is a very nice polish, photos show three coats (it’s sheerer than it looks but builds well), with Misa BREAKneck top coat.

Intensely shiny and sparkly, it’s a flakie not a glitter; applies pretty well and dries fast.

I love gold. This gold is much warmer than most, but I still loves it.

And then, because The Bling Was Not Enough (heh), I added more to the accent nail – namely a coat of Ninja Polish Shattered Star, then another coat of my gold and silver franken. And more top coat. Mmmmm bling.

This just added the right amount of sparkle to my day.
Have a lovely day
Ami 🙂
PANZ Week 5: Glitter Gradient
Week 5! And thanks to Queens Birthday here in New Zealand, plus this cold I have making me super scatty, this completely snuck up on me. I had some trepidation with glitter gradient, I’ve done several (mostly to cover up tipwear), but I’ve never been happy with them. So I went looking for internet inspiration, found some, and came up with this:

The inspiration was from this website here, and she has a black and silver theme – and much longer nails! And I loved them, they’re gorgeous. I did want to swap the black for a blue though, which I did.

The nude is Nfu Oh 08, two coats. Then I did a raggedy (I can’t draw straight lines, ok?!) french type tip with OPI Russian Navy – one coat, and then two dabbed coats of Le Chat Hologram Diamond glitter.

I must say, this is my favourite glitter gradient so far, ever! It looks quite classy to my eye, without being in anyway boring, and glittery without being over done. Plus I love soft neutral pinks and they last on my fingers about 2 seconds before I get bored and change it, so this gives me a cool way to wear those colours 😀

I did cheat and only do this on the four fingernails I take photos of, so now I’m going to do the rest of my nails to match. Yep. Happiness is 🙂

Have a wonderful day
Ami
PANZ Week 3: Galaxy Nails
Galaxy nails! Oh how I love thee. One day I shall get better at thee.

Until then, though, I stick with my tried and true concept. And failed in the cleanup, because my hands are rough and yuck after this weekend, sorry. Avert eyes from cuticles. You have been warned. 😉

I’m going to say (thanks to Sister V for the idea) that this galaxy nail is inspired by the space surrounding the Horsehead Nebula. And that, around my ring finger nail there, is part of it’s mane. It’s NOT a stray hair that I didn’t see until I was editing the macro shots, ok?! 😀

Polishes used: Actually, I started with two coats of Kolt Lunatic over a coat of Kleancolor Black, then I sponged on a handmade polish (Denim & Sequins), more Kleancolor Black (to break up the blue and red and add some depth) and then one and a bit coats of OPI Servin’ Up Sparkle. (a bit – basically one coat, then a few dabbed bits where I thought more ‘stars’ should be). Then a top coat, and done!

Have a great day
Ami 🙂
Kleancolor Midnight Seduction: Swatches, Layering, Comparisons
You know, I don’t know where I got this polish from? My sister V? A fellow polish addicts destash? Argh! Anyway, this is Kleancolor Midnight Seduction (really?! Odd name for this colour!) a pretty, mini glitter which looks pink, purple and blue to my eye. These photos show three coats

It really, really, doesn’t want to be anything but sheer. And the trouble with Kleancolor polishes, apart from the smell (which I actually don’t find too bad), is how thick and slow drying the sheer polishes are. It was alright, I guess. Subtle. Not too showy. A bit boring, for me. And it wouldn’t have dried quickly like this.

So, why not add more, see if I could lift the bland aspect out? This is one coat of my mega-glitter franken. Needless to say, my favourites are the big circles.

Still, a little bland and sheer!

But, why not matte it? I used Essie Matte About You – to see how it looked, and to speed up the dry time.

And it looked… BORING.

Actually, it looked like I was trying to put the FUN in FUNgus hehehe
So, next idea. Layer it over black! And then I noticed my other Kleancolor bottle, waiting to be tried: Kiss Goodbye. And although the colours ARE different, the overall effect is kinda similar. I layered them over Kleancolor Black (one coat), and from left to right the polihses are Midnight Seduction, Kiss Goodbye, Midnight Seduction, Kiss Goodnight.

And they looked great over black! Only one coat too, so dry time was on the faster side of normal, not the slower side of forever.But I really, really thought they were missing holographic sparkle. Possibly because they looked so galactic… easy fixed with one coat of OPI Servin’ Up Sparkle.

(Servin’? SERIOUSLY?Ahem)

And here are the bottles side by side – see, nowhere close to being dupes, but somewhat similar in theme and execution 🙂

Have a great day
Ami 🙂
OPI Don’t Touch My Tutu: Swatches, Layering, and many, many photos!
My family got me a nail polish voucher from Candy Girl for my birthday, and I spent it so fast there were scorch marks across the computer screen 😀 One of the polishes I snagged was OPI Don’t Touch My Tutu, a sheer jelly from the New York Ballet Collection, and one which I have seen on my bloggers nails in many combinations. I love a versatile polish.

This is two coats of Don’t Touch My Tutu. For those of you who love a glorious, glossy, clean nude nail look, this right here might be a good option. Even I liked it! (side note: you see my wonky nail line on my ring finger? I was feeding a horse some grass and it bit my finger. And held on. And tried to drag me over the fence, because I was screaming and it got scared, but regardless, HALFWAY OVER THE FENCE. Luckily, it eventually let me go, but the skin under my nail fell out and never really regrew. Motto: Horses Bite Hard: When Feeding Them Keep Your Hands Flat. And plus, if they bite you, try not to scream. It’s ok, I was about 11, I’ve mostly gotten over it hehehe)

So shiny, so bright. So… needed to be layered. I went with two lovely coats of Lush Lacquer Seas The Moment. Mmmm love this, it just looks really fresh!

Sun..

And then one more coat of Don’t Touch My Tutu. It softened it all down, sort of water colourish.

Sun

More layering ideas! This one inspired by a combo of DTMT and Crows Toes Maxxed Out (which I desperately want), from (here). But, as I don’t have Maxxed Out, I used a franken of mine on the tips.

Sun.

The trouble is, I think that the yellow base to this franken makes me look like I have the worlds most sparkly snot on my fingers. Sorry for any mental image distress that may have caused, but it was back to the drawing board for me!

Now I decided to layer two dabbed coats of Nail Pattern Boldness’s Bitches Brew over two coats of DTMT.

Sun. I quite liked this, but it just looked too patchy for me to be totally happy with it.

So, one coat of DTMT. The great thing about DTMT is that even though the first coat can be a bit streaky, for some reason it doesn’t look that streaky layered over another polish.
I did NOT expect the gold to look yellow. My mother bought some lycra in the 90’s, which she made all sorts of things out of. This combo REALLY reminds me of that material 😀

Macro. Mmm 90’s aerobic wear. 😀

Sooo…. back AGAIN to the Maxxed Out concept – this time I layered a few different polishes to try and achieve a similar effect. Two coats of DTMT again, followed by one coat of OPI Servin’ Up Sparkle, and one coat of Nabi Gold Big Ball. Topped off with China Glaze Fast Forward.

Well, I called this a moderate success.

I left it on for more than five minutes, anyway!

Have a great day
Ami 🙂
OPI Stay the Night – Liquid Sands – Swatches
My first OPI polish in a very long time, this is Stay the Night from the new Mariah Carey collaboration. Please don’t hold that against me. It looked a very pretty polish!

And, it is. These photos show three coats, and I found it needed all three: it looked good at two coats, but was a little patchy. I didn’t use top coat, and this is one of the new Liquid Sand – aka gritty – textured polishes. One thing, in most swatches I thought it was black with pink sparks. It’s not, it’s a very dark brown instead, and it looks AMAZING.

I did think this was going to be very gritty, but it feels more like fine grit sandpaper that has been worn down a bit, soft little bumps of grit, I’ve had worse grit from normal glitter polishes (China Glaze, some of yours, for example!), and this was really tactile, I kept patting my nails, but in a good way. It certainly doesn’t catch on sheets, hair or clothes, and if you were the sort of person who’d ever pick their nose *cough* then this will not interfere with your habit 😉

I adored this polish. It was a lot nicer on than I thought it would be, the pink glitz added something special to the vampy brown, and it went really well with my tanned (olive) skin tone. I also think it will look great on winter hands, too!

The dry time was actually quite slow (it goes on shiny but lumps up as it dries), which was moderately disappointing, but once dried it wore like iron.

Whole hand photo…

On the whole, I’d call this a sexy polish. A bit different, but not in-your-face, and very easy to apply and wear.
Then, because I thought I should, I added top coat. But only as an accent nail. I tell you, this was amazing straight out of the bottle!

And… it was still pretty. But nothing special. To make sure it was smooth I used a coat of Nail Pattern Boldness Glitter Food, then China Glaze Fast Forward top coat. It was super smooth. And, a wee bit boring compared to it all sandy. Nice to have the versatility though!

Have a wonderful day
Ami 🙂
Two new frankens – including glitter!! Matte glitter!
I have previous blogged about some of the franken polishes my mother and I have been making – often from scratch. I’m having so much fun with it! And as one of my biggest expenditures (when it comes to nail polish) is glitter polishes, it’s logical that I want to make some of these types of polish for myself :). This is how I found myself spending a mildly shocking amount of money on solvent resistant glitter from Glitter Unique.
Go on, have a look. Double dare ya. I also bought some from You Mix – both stores shipped quickly, packaged well, and have awesome stuff.
These are two glitter frankens I made, instantly, with remnant polishes and some of the glitter from Glitter Unique (just because it got here first, ok?! No favourites here!) This is the first: The polish was L’Oreal Sand Dollar – and it was just too… beige for me. I added white hexes and hearts and a sprinkling of gold flakes.

I really liked the concept, which I was modelling after some other lovely indies out there (Hare Pegasus et al, thinking of you!).

I added a touch of Mode Sweetness and Revlon Sheer Pink to Sand Dollar to try and get the colour right, and a drop or two of OPI Steady As She Rose. I probably should have put a touch more Steady as she Rose into it, it was still a little too putty like for me.

Also, this has no suspension base in it, so the glitter sinks to the bottom. I did find that a good shake was enough to bring the glitters back up, but I did have to shake after every nail or so. So, not something I’d make again without suspension base, but fun to play with.

My other one was based on a mystery polish I have had for awhile, an old Barry M I believe (bought second hand with eroded labels). It’s a whole bunch of iridescent teeny glitters in a clear base.

I added dot glitters to this. Red and blue small shiny dots, large black matte dots, and stack loads of silver holographic butterflies.

Right hand! hah! I’m getting better at taking photos of my right hand 😀
I layered this over OPI Steady as she Rose (it was right there, after all!) and tried to hide my inner 12 year old girly girl squealing away. Then Mr Husband glances over, grabs the bottle, looks at it, and says ‘shall we call this one Hello Kitty Cosmos, then?” *&^&(()*&*(& hehehe. Funny.
I did layer this over a grey polish too, see if it looked as girly over that: This is Misa Grey Matters.

And yeah, not as girly, but still pretty girly. And I love it even more over grey.

I can see me wearing this over almost everything… and can’t wait to get into making more polishes with matte, satin, or interesting shaped glitters!

Have a sparkly day
Ami 🙂

