Movember nail studs from Born Pretty Store – review
Another review from Born Pretty Store – this time I chose some gorgeous little nail studs – rhinestones and all – which I thought would be perfect for Movember 😀 And they ARE, see?!

They are little faces, with black pupils 😀 I think they are hilarious.

Pretty, but utterly entertaining.

The other nails have a navy blue and mid blue plastic wrap mani (painted first with navy , then splodged the lighter on top with a scrunched up piece of plastic wrap). And I really loved that effect too, in fact I want to try it again soon, I have IDEAS. The little studs are held on with nail glue, and should last for a fun night out. They do stick out from the curve of the nail, but are ideal for an evening or temporary bit of fun and super easy nail art. Highly recommend!

You can get these ones here, and my coupon code is below, for 10% off.

Have a great day!
Ami
Born Pretty Store Review: Halloween Water Decals
Born Pretty Store asked me to review some more items, Halloween themed this time, and of course I said yes. So a couple more reviews coming up soon. I will say right off the bat (pun intended 😀 ), that these took quite some time to arrive – and, (thanks Murphy!), arrived the day AFTER Halloween. Ah well – I know I will be totally set for next years celebration 😀
The first of the items is this sheet of water decals – all in thematic colours (purple, orange, black mostly) and neat images.

I kept this one simple, using the middle images, graveyard and tree and bats
 And sunshine photo..

The background is Butter London Two Fingered Salute, with the water decal on top, and top coated.

I really liked this effect, and how simple it was to do! Would highly recommend these decals or similar ones for a very easy themed nail art (Born Pretty Store has a whole section on nail art here). You can find these particular decals here, but search there are loads more. I have a code for 10% off your order 🙂
Have a great day
Ami
How To Eat a Boston Bun – in Exceptional Circumstances.
There is some back story here, and it goes like this. My sister V decided to go sugar free on the week days. This is good, this is great. Except if you have no real strategies in place… for when cravings and withdrawals hit. And for someone so organised, she missed that memo this week. Argh, I feel the pain. Anyway, this is a story about how to eat a Boston Bun (aka Sally Lun) in a the best and fastest way.
NOTE. This is a no judgement place. If you have never craved or needed food so badly that you will mainline a whole cake, well, I do feel sorry for you. You lucky hypothetical reader you.

So! Day 2.5 of the no sugar diet; minus good mood and plus headache and shakes, Sister V finds herself in the supermarket looking for coffee (I believe) and coming out with a whole Boston Bun which she proceeds to devour entire. As you do. Or maybe not you, but I certainly have. And this is where it gets awesome, because, here is a pic of how I normally (I mean, the once it has happened *cough*) would eat a whole bun.

I can see this ending badly… and I should have put makeup on before taking these photos. But hey. Here’s some honesty 😀
Not particularly easy, and also very messy.

I know, I know, so glamorous 😀
Sigh.
Now! Sister V’s genius!! YES! Step by step, in case anyone else ever has the need. This is a duty I feel I have, to share this with the … world? Anyway.
Step one: cut the top off the Boston Bun.

Step one! Slice the top off the bun!
Step Two: butter the bottom half. Yes – it’s cut all raggedy. In a hurry, remember? 😀

Step Two! Plenty of butter for you!
Step Three: add jam. Optional, of course. Usually I just add butter- but anything goes. This IS a no judgement zone 😀

Step Three! Now it’s as sweet as can be!
Step Four – and most important: put the top back on. UPSIDE DOWN.

Step Four! Messy face no more!
Step Five: eat! Eat it like a sandwich. Just get right in there 😀 And now you do not have to fear the coconut and icing in the eyebrows! Dignity is kept! Er… ok, maybe not. But hey. Lack of food for Ron (Later Ron) does count for a fair amount some days 😀

Step Five! something something something LIVE! (ok, ok. Sorry)
Thank you, Sister V, for this story and the how-to. You absolutely made my day yesterday. Love you!! 😀
Have an awesome, clever, and food remnant free day
Ami
The Most Awesome Hat that ever Awesomed – from Neevynoonar
A long time ago – but not that long – I had a stall at a craft market in Palmerston North, alongside a long term crafter and fellow market goer, Cathie. She makes everything 😀 Felted badges. Knitted and crocheted goods. Sooo many awesome things. And off the top of my head I went, ooh I’d really love to get a helmet hat and beard, did you think you could make one sometime? And she said yes, and I went WHOOO! And that was the last of it until she remembered, and reminded me, and went and MADE IT. Yesterday, I went and picked it up. An amazing, one of a kind, knitted and crocheted helmet hat and beard. Prepare for photos!

Helmet and beard! Yes, I moustache you a question. Is this not the most magnificent?!

I did ask for a rainbow beard, even though I haven’t seen one anywhere, and it is much more awesome than I expected. It’s also separate from the hat, so I can wear it with other hats. And wear it I will, it keeps my face sooo nice and warm 😀 Plus, bad skin day? Who’d know?! And check it out with the visor down…
 Then just the helmet on it’s own – the visor is attached with some seriously cool buttons (functional!) and can be raised or lowered. When charging someone. With a crochet hook maybe. 😀
 Closer look at the crest – that amazing red wool crest took her 7 hours to make – and she is FAST at this. I have some guilt. Which is offset by also having the coolest helmet ever. 😀

Cathie has her Facebook page here – you could always ask for something, she is lovely. She also has the most amazing things at craft markets! She has said she won’t make a crest quite like this one again (totally understandable) so I’ll gloat about my amazing one of a kind helmet … and anyone who wants something similar could always ask 😀
Right, I’m off to leap onto my hobby horse and ride off into the sunset. Wish me luck and send me sunscreen!
Have an awesome weekend
Ami
Messy Mansion stamping plate MM40
Just for fun, I thought I’d do a review of a Messy Mansion plate. I have bought two of their plates previously, and adored the quality, and when I saw they’d restocked some plates and the stamping heads, I couldn’t resist and nabbed another two plates and the soft stamp set with the tin.
Stamping plate! This one is a knitting plate, though I see that crochet needle over there too, plus zips, buttons, and a cat. Because we all know how much cats like knitting. Or impeding knitting 😀

Like most plates, they arrive in a little bag…

with a blue protective plastic cover over them, which needs to be removed before use.

And the stamping heads – in a really adorable tin. Note though, it’s a small tin. I hoped to be able to fit a few more stamping heads in it, and I can, but not a lot.

Still, very cute 😀 These ones are the soft stamping heads, and I have a stamping barrel already to use with them. These are fractionally larger than the ones I am used to, which is perfect because they stay IN the barrel of the tool. The other ones would fall out and annoy the crap out of me.

Designs! I tried one of each of the knitting patterns, first over deep red (Warpath)

please ignore the mess along my cuticle, I used acetone and a brush but that bit remained like a stubborn salesperson… ugh
and then over a lighter yellow with glitter in it (You Go, Glen Coco).

I had this on my thumbs, and it made me giggle – I smudged it, and it looks like it reads ‘I love knots’. No, not in wool I don’t 😀

The stamping polish was one I made, but if anyone is looking for one, may I recommend Mundo De Unas or Kleancolor Black or White for stamping with.
So there it is! I have used the fox and wolf plate several times too, and it’s gorgeous. My favourite images there are the wolf howling at the moon, and the fox and the raven in the Celtic circle. 😀
Have a great day!
Ami
Born Pretty Store Review: Stamping Plate QA93
Last of the items to review from Born Pretty Store was this stamping plate (which can be found here). I loved the stars and the swirly pattern, but was curious as to the size of the patterns, as some I have previously tried from Born Pretty Store have been on the smaller side. Here is the plate, with the removable blue plastic on it… and as you can see, these are not small!

The first one I tried was, of course, the stars. I used A England Excalibur (the first version) as the stamping polish, and stamped a variety of stars over Dance Legend Anthem.

They turned out beautiful – I’m no expert stamper, even though I am improving, but these were lovely and clear and easy to use.

Next I tried something very different for me – the plaid pattern!

Over a nude shimmery polish I stamped the plaid in black (a stamping polish I made, but any one coat black will work), then used jelly polishes in orange and red to add some colour over the stamping. I didn’t like the effect much, so I added shimmer. And still didn’t much like it, but I have to say, the lines stamped really well, and any crookedness is just my inability to do anything straight 😀

And then finally, I used the swirly brocade like pattern

This was, again, with black, over another of my polishes. I loved this effect – simple, yet rich.
 And to show the size, this is the stamp on my thumbs – which aren’t long, but they are wide, and this stamp covered it easily.

I am very impressed with this stamping plate! 😀 This was sent free for honest review, and can be found (among many others, at Born Pretty Store ). Feel free to use my discount code if you like, found along the right side task bar there – for a 10% discount.
Have a great day
Ami
Peacock Pie Polish SUPER SPAM POST :D
The awesome Serra from Peacock Pie has been super busy making polishes … polishes that I can’t resist 😀 I have a whole bunch of them to share today – please excuse the short nails, I removed the acrylics. Full disclosure, most of these were bought by me (I regret NOTHING!) some were sent because she is a sweetheart, and we bounce polish back and forward to each other. So, not free for review per se, but just because I am a lucky sausage 😀
Astrella: Mint, purple, teal matte glitter, lilac metallic hexes in a clear base with a lovely sprinkling of spectraflair for added rainbows 🙂

I have layered it here over Color Club Wild Cactus – one coat of Astrella over all nails except the pinky nail, which has two coats.

Next is Midnight Dreary – one from her Fairy collection, based around some gorgeous artworks by…This has periwinkle, red and black glitter and large holo silver dots (for the moon!) in a deep jelly base. I thought this would be sheer, so I layered it over Miki no 29 – just one coat… check this out, I left my index nail bare of Midnight Dreary for this photo so you can see how dense this polish is.

Gorgeous! It would be opaque on it’s own in 2 coats, I think, but I do like layering them over creme bases, it just makes the edges a bit tidier looking sometimes.But seriously, any colour underneath would work, this puppy is so dense and awesome.

Pet Storm Dragon – over Black

This is another holographic glitter topper in a clear base, but I think she made this one for me 😀 Dragon in the title, blue, purple, holographic? Yep, made it for me.

One coat over the middle two finger nails, two coats over index and pinky. So pretty! After swatching I put this combo back on 😀

Royally Sparkled – 3 coats on it’s own

I love this polish, and am sad I couldn’t get better photos of it!

This is one I should have layered, though it is plenty opaque on it’s own, just to tidy the edges up because I can’t paint straight 😀 I love the copper, gold and silver mix of glitter, and the way it pops against the purple!

and last for today is Seaweed – 3 coats

this is an interesting polish!Mid green crelly base and a mix of periwinkle and white glitters with a sprinkle of navy. I will layer this one next time too, to tidy up the edges, but it’s a very nice, slightly subdued polish.

Love these! You can check out Serra’s blog here, and I think she is changing her shop sites too, but in the meantime you can find her Etsy shop here 🙂
Have a great day
Ami
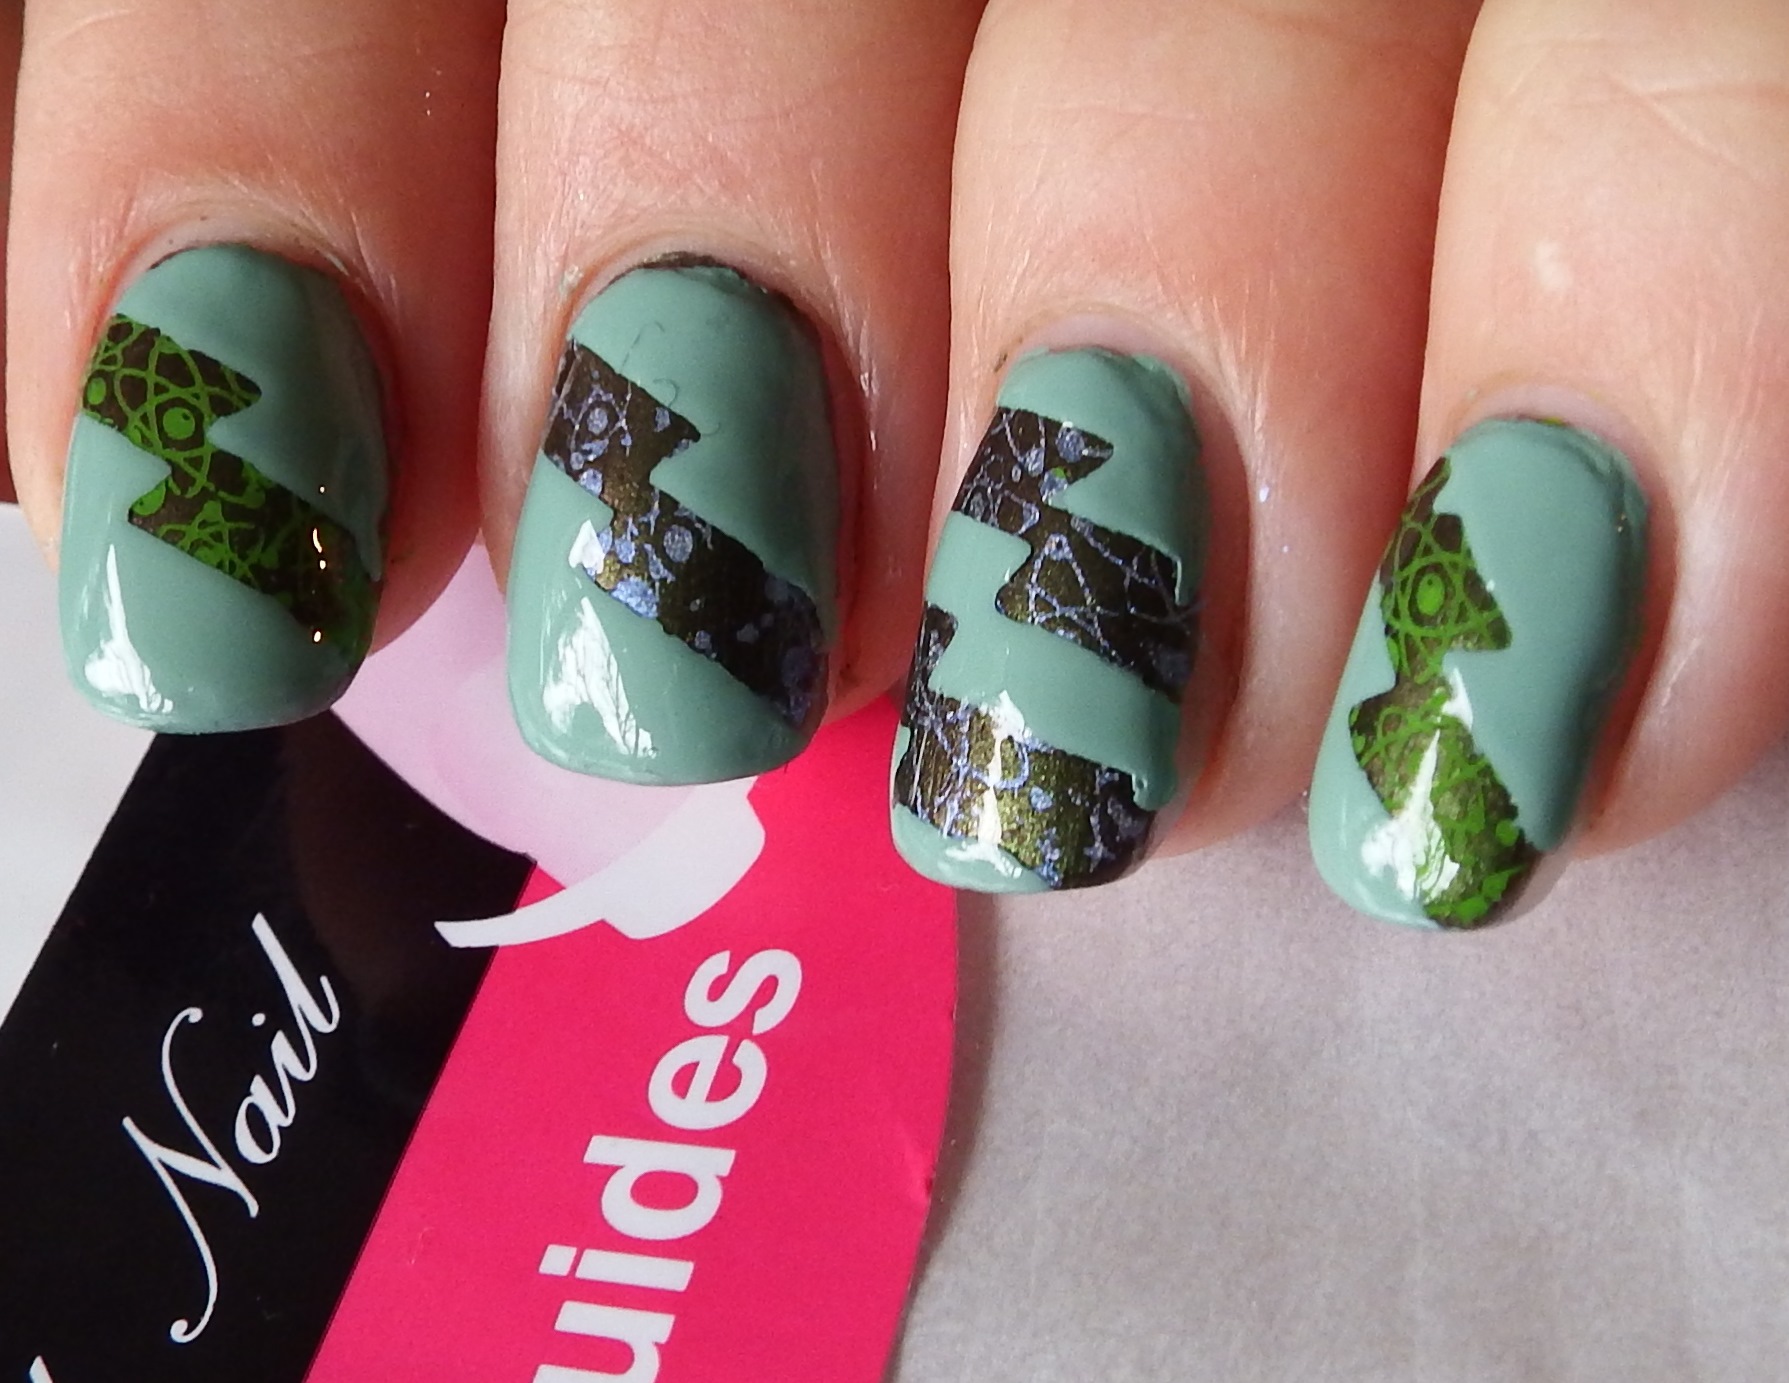
Born Pretty Store Review: French tip sticker – zig zag
Another gorgeous free for review product from Born Pretty Store, this is a simple yet fun sticker that acts as a stencil. The one I got is a zig zag. The first design I tried was this:

Which was an attempt to use it as a french tip stencil. It didn’t work out that well for me, especially in the combination of polishes I used, so I tried again.
That one didn’t work either, again because of user error – the polishes I used were fine, but then I stamped over it and the french tip line wasn’t visible. If at first you don’t succeed … sky diving isn’t for you. Polish is though, so I kept on trying 😀 And came up with this:
Which I did link through to my Facebook page, because I was quite happy with it! See my nails? All long and stuff? Yeah, totally not my nails. Thanks to Jessie from Nailed It NZ for my acrylics, they lasted 2 weeks beautifully and were a lot of fun to play with nail art designs with 😀

And finally I wanted to play with another colour scheme, and I was really getting into these stickers 😀

With the glitter over the top I could get away with the naked nail underneath, which is nice! Also, yep, short again 😀 So only one sticker fits.

In summing up – these took me a bit of getting used to. I think they are awesome though, but I would probably go for a curved, easier one next time, especially if I wanted to use it as a french tip guide sticker. Born Pretty Store has lots of awesome things out, and free shipping. My coupon code (AJBQ10) is along the side there, which gives 10% off the price.
These stickers can be found here, and were provided free in return for honest feedback 🙂
Have a great day
Ami
Not just nails, but makeup hoarding too?!
*hangs head in shame* It’s true. Although, I still have more polish than makeup, but it turns out I just want all the pretty colours and glitter and shimmer. I am a Magpie. No judging 😀 Thought I’d do a quick blog post on how I store my makeup, what I do, and a quick organisation in progress 😀
This is my makeup case, not sorted out (although I have grabbed out stuff that I am destashing to my sister, but this is a bit of a mess). I keep my foundation/blush/concealer, eyeshadow palettes, and lipsticks and glosses in here. I also use a hanging storage thingy that I bought from a second hand shop to hang my daily moisturiser, brushes, and other misc makeup weaponry.

I am absolutely wearing a baggy jersey and trackpants. Just be grateful I’m not more in the mirror 😀 And yep, the tape on the mirror is there on purpose 😀
Taking photos of it made me tidy it up, so here it is again, better organised 😀 YAY!

the mess in the middle is from a body shop brush on bronzer which spontaneously combusted one day. Gah. Everything was bronze and sparkly for AGES
I have a box on my drawers with untried eyeshadows in it – I try and use one untried and at least one tried eyeshadow at a time – spread the love around 😀 The sad thing is, I don’t wear makeup everyday and when I see all these pretties I feel like I’m a greedy cow who should be slathered in coloured powder every waking minute. Ah well.

And this is my drawer with loose eyeshadows … the indie eye shadows. I have them in little plastic food containers arranged by colour, to make it easier to find one I want.

This is them, opened 🙂 I find it pretty interesting to see what colours I gravitate towards… purple, blue and green – same as the polishes – I have more brown eyeshadows than polishes though, which makes sense with my eye colouring. The only reason I have as many blues as I do is because I adore the colour so much 😀

And finally – I have a lot of samples of shadows – in little baggies, which are awesome to test colours but a pain to store, so I’ve stashed them in these – one is a CD holder (has the cool toned colours) and a business card holder (warm toned shadows).

So many pretties – not enough face. If anyone sees me on the school run painted like an Avatar native you’ll know I’m trying to utilise more of my shadows… 😀
Have a great day!
Ami
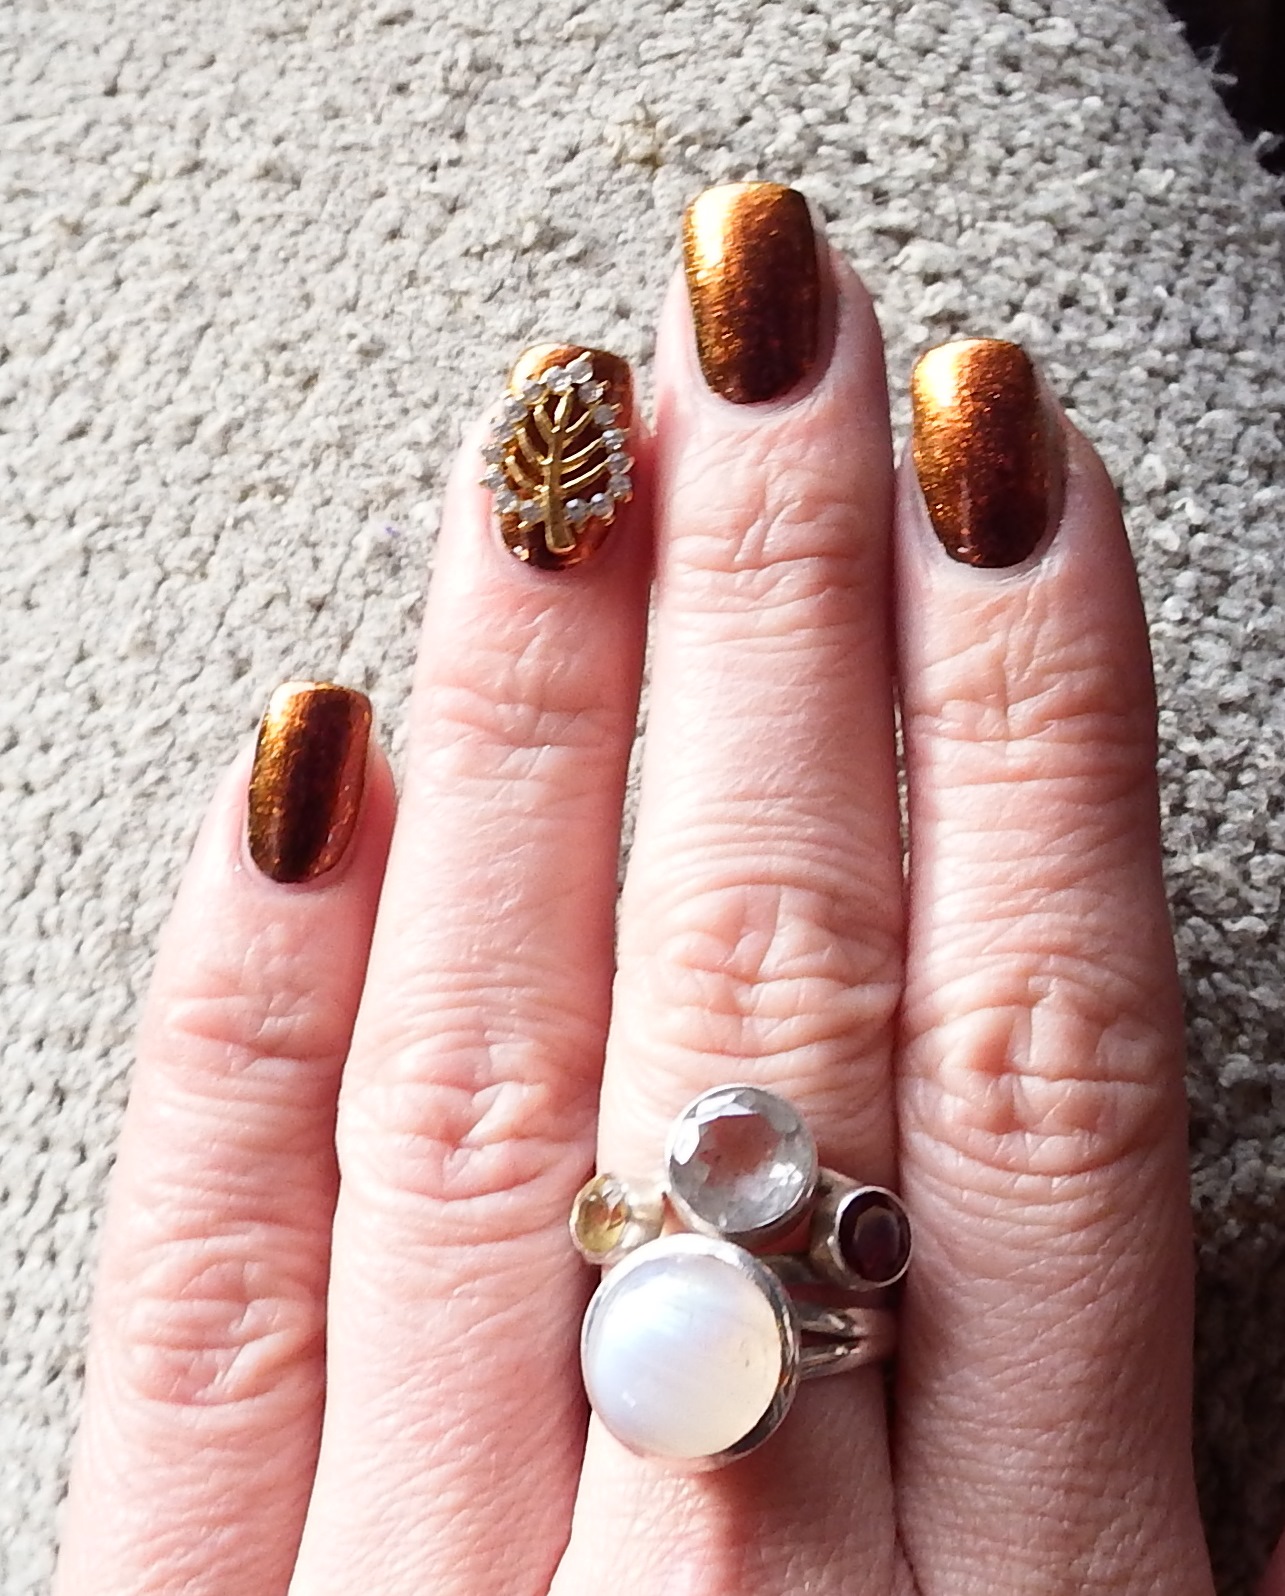
Born Pretty Store Review – 3D nail decoration – Leaf
The lovely folks at Born Pretty Store sent a few more things to review, and here is the first – a gorgeous 3D nail decoration in the shape of a gold leaf with sparkly embellishment 😀

I have it here over Dance Legend Mars, and I like the way the colours complement each other, very autumnal to my eye

You can find them here on the Born Pretty site, US$3.06 for two, and they are reusable. I have used top coat to press this on, but if I was wearing it for longer (which I will, hopefully tomorrow night!), I’ll use nail glue to make sure they stay on. They don’t have much of a curve, so don’t lie flat against the edges of my nail, but as these are for special occasions I don’t mind one bit. 🙂

I do enjoy these little leaves, they aren’t so big that they won’t fit on my actual nails, and it’s nice to have another way of adding jewellery. Yes, I am a magpie 😀
Born Pretty Store have loads of things on their site, not just nail art related (though a huge amount of that), and free shipping; I do have a code for 10% off on the right hand side of the page here, or codes can be found all over the internet 😀 (if mine is used 10 times they’ll sponsor a giveaway, I think, I don’t get a financial kick back from it, I pinky promise).
Items provided free for honest review 🙂
Have an awesome day
Ami